April 13, 2008 Welcome Home Bakers and Friends,It's been over two month's since I sent out my last newsletter and I hope you are all itching for a few new recipes to make to celebrate the upcoming holidays; Passover, Eastern Orthodox Easter, Cinco de Mayo and Mother's Day (the last 2, coming up in May). I love this time of year, as the weather is changing for the better and our garden is starting to look very pretty with all the new Spring foliage and flowers are beginning to bloom, such as tulips, poppy's (California's official state flower), the Calla Lilies, and a few of our roses are showing their lovely colors too. What a sight, especially after a gloomy winter. Not too much new to tell you, except most of the things I am baking these days are "sugar free" because of my diabetes and also because of my weight loss program that I've been on for about 10 months now. It's all been worth it, as I have lost over 60 pounds and am off the insulin too. I do hope you'll enjoy these recipes and try one or two of them for Spring, and for the upcoming holidays. Please let me know if you made any of them, and what you think. 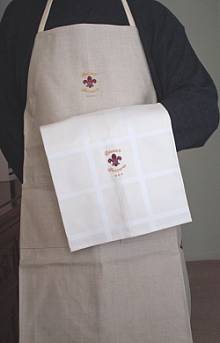
Note About Diana's Desserts Logo Aprons and Logo Kitchen TowelsBig Sale on NowI have put my Diana's Desserts Logo Aprons and Kitchen Towels up for sale on my website again. They are highly discounted and really well-made, so if you can, take advantage of the great savings on them. The aprons were previously $19.00, now down to $5.95, and the kitchen towels were $13.00, now only $2.95, and you can purchase a Diana's Desserts Logo Kitchen Apron and Towel Set (one of each) now for only $7.00, a real savings.Click on this link to bring you to the page for the Aprons and Kitchen Towels on Diana's Desserts Website I except payment by PayPal only. Well, it's time to read and hopefully enjoy some of my recipes for this lovely time of the year. Enjoy!! 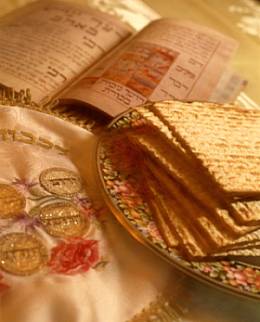
PassoverCelebrated from Sundown April 19, 2008 through Sundown April 27, 2008 Passover is the 8 day observance commemorating the freedom and exodus of the Israelites (Jewish slaves) from Egypt during the reign of the Pharaoh Ramses II. A time of family gatherings and lavish meals called Seders, the story of Passover is retold through the reading of the Haggadah. With its special foods, songs, and customs, the Seder is the focal point of the Passover celebration. Passover begins on the 15th day of the Jewish month of Nissan. As the Jewish day begins at sundown the night before, for the year 2008, the first night of Passover will be Saturday April 19th. In 2008 Passover lasts until sundown Sunday April 27th. In Israel, Passover lasts for one day less, which means it is celebrated until sundown Saturday April 26th. Passover Recipes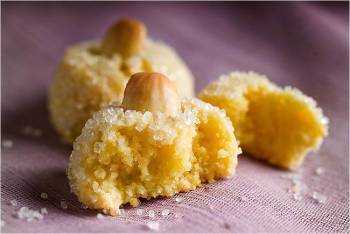
Almond Lemon Macaroons for PassoverServings: Makes about 30 macaroons Comments: Passover without macaroons is like Rosh Hashanah without sweet honey cake or Thanksgiving without pumpkin pie. Sephardic macaroons use lemon zest for flavoring rather than almond extract. The secret to good macaroons is to not overbake the cookies. Although these macaroons take only 8 to 10 minutes to bake, the dough must be refrigerated for 12 hours, but the wait is certainly worth it. Ingredients: 2 cups whole blanched almonds, plus about 30 almonds for decoration 1 cup granulated sugar 1 large egg Finely grated zest of 1 lemon. Instructions: 1. Using a food processor equipped with a metal blade, grind 2 cups almonds very finely. Add 3/4 cup sugar, the egg and lemon zest, and pulse to make a cohesive dough. Transfer to a medium bowl, cover and refrigerate for at least 12 hours. 2. Preheat oven to 350 degrees F/180 degrees C. Line a baking sheet with parchment paper or a nonstick liner. Place remaining 1/4 cup sugar in a small bowl. 3. Pinching off pieces of dough about the size of a walnut, roll them first into balls, then into sugar. Gently press an almond point first into top of each cookie, so that half the almond can be seen. Arrange cookies one inch apart on baking sheet. 4. Bake until cookies have barest hint of color but still remain soft, 8 to 10 minutes. (Cookies must be soft when removed from oven to avoid excess hardening when they cool.) Cool completely, and store in an airtight container. Makes about 30 macaroon cookies. Click here to view recipe and photo of Almond Lemon Macaroons for Passover on Diana's Desserts Website 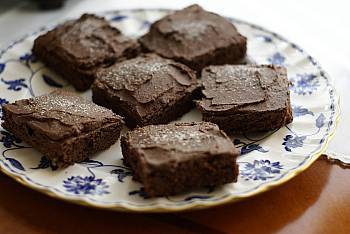
Chocolate Passover Brownies with Chocolate FrostingServings: Makes 16 brownies Comments: Wonderful classic brownies for Passover and so delicious with the rich chocolate frosting. These can be served after a meat or dairy meal, depending on whether you use butter (for a dairy meal), or Parve-Kosher for Passover margarine (for a meat OR dairy meal) in the recipe. TIP: If using margarine, remember to read the ingredients label on the margarine container or box, as some brands of margarine contain milk or other dairy products. Ingredients: 4 eggs 2 cups granulated sugar 1 cup (2 sticks/8 oz./226g) butter or margarine (if using margarine, use margarine that is Parve-Kosher for Passover), melted 6 tbsp. matzo meal 1 cup unsweetened cocoa powder 1 cup chopped walnuts (optional) Chocolate Frosting (see below) optional Garnish: (optional) Confectioners' sugar, for dusting tops of brownies Instructions: Preheat oven to 350 degrees F/180 degrees C. Spray an 8 x 8-inch baking pan with non-stick cooking spray. In a medium bowl, blend eggs, sugar, 1 cup butter or margarine. Mix in matzo meal, cocoa powder, and walnuts (if using). Transfer batter to prepared pan. Bake in preheated oven for 25 to 30 minutes. Let brownies cool completely on wire rack, then cut into squares and spread with frosting. Dust brownies with confectioners' sugar, if desired. Chocolate Frosting Ingredients: 4 oz. semisweet chocolate, melted 1 tbsp. butter or margarine (if using margarine, use margarine that is Parve-Kosher for Passover), softened 1/8 tsp. water Instructions: In a small mixing bowl, blend melted semisweet chocolate, butter or margarine, and water (add additional water, if needed). Spread over brownies when completely cooled. Makes 16 brownies. Source: DianasDesserts.com Photograph taken by Diana Baker Woodall ©2007 Click here to view recipe and photo of Chocolate Passover Brownies with Chocolate Frosting on Diana's Desserts Website 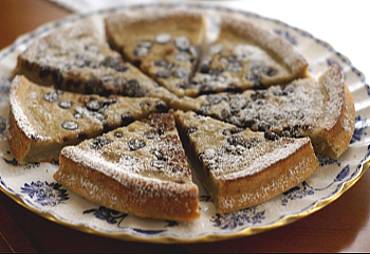
Passover Banana Cake topped with Chocolate ChipsServings: 6-8 Comments: This quick and easy cake can be made for a dairy or meat Passover meal. In other words, it's Parve for Passover. The cake doesn't rise too high, but all the same, it's very tasty. My husband says it's texture is a bit like a bread pudding, although there's no bread in it; strictly Kosher for Passover, made with a Kosher for Passover Cake mix and other neutral ingredients. Ingredients: 1 (12 oz.) box Passover Yellow Cake Mix (I recommend Manischewitz Yellow Cake Mix for this recipe, NOT the Extra Moist Yellow Cake mix made by Manischewitz) 1/4 cup water 2 eggs 1 cup mashed or pureed ripe bananas (approximately 3 small or 2 medium bananas) 1/3 cup semisweet chocolate chips Garnish (optional) Kosher for Passover Confectioners' sugar Serve with: Whipped cream (dairy meal) or Non-dairy whipped topping (meat meal) Instructions: 1. Preheat oven to 350 degrees F/180 degrees C. Spray an 8 or 9-inch square or round cake pan with nonstick cooking spray. 2. Beat together (by hand or with electric mixer) all ingredients, except the chocolate chips, for 1-2 minutes until smooth. 3. Pour into prepared cake pan and sprinkle chocolate chips over top. 4. Bake in preheated oven until cake springs back when gently pressed, about 25-35 minutes. Remove from oven and leave cake in pan to cool for 15 minutes, then transfer to wire rack to cool completely. Dust with confectioners' sugar if desired before serving. Cut cake into squares or wedges (depending on what type of pan you used). Serve each piece with a dollop of whipped cream if having a "dairy" meal, or if having a "meat" meal, serve with non-dairy whipped topping. Makes 6-8 servings. Photograph taken by Diana Baker Woodall ©2007 Click here to view recipe and photo of Passover Banana Cake topped with Chocolate Chips on Diana's Desserts Website 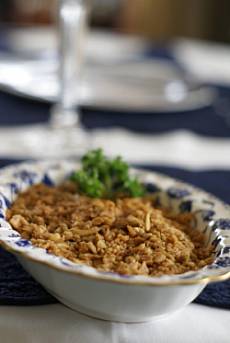
Passover HarosetServings: Makes approximately 12 servings Comments: The Seder Plate at Passover At the center of the Passover Seder table sits the seder plate, where the symbols that define the Passover celebration are placed. The plate's contents vary, but it's essential elements, the shankbone, the roasted egg, the bitter herbs, the greens, and the haroset mixture of fruits and nuts tell the story of a people who endured generations of slavery in Egypt until, miraculously, they found freedom with the help of God and their leader, Moses. These seder plate symbols also remind today's Jews that their journey remains unfulfilled, and that ultimate redemption lies ahead. Haroset is one of the 6 Passover Seder Plate elements or symbols. The other five elements are: Maror: Bitter herbs, such as horseradish. Karpas: Non bitter vegetable, such as parsley or celery. Chazeret: Bitter vegetable, romaine lettuce. Zeroa: Shankbone, usually a roasted chicken bone with a little meat left on it. Beitzah: Egg, usually hard-boiled and slightly roasted in the oven. Ingredients: 2 cups chopped apples 1 cup chopped walnuts 1/4 cup Concord Grape Wine or Concord grape juice 2 tsp. ground cinnamon 2 tbsp. honey, to taste Instructions: Core, peel, and dice apples very fine (or chop in food processor). Add cinnamon, chopped walnuts and a little honey to sweeten. Add just enough wine or grape juice (if using) to moisten the mixture. Haroset should resemble mortar after being prepared. Place in small dishes at each place setting so it is available to all of your guests. Makes approximately 12 servings. Photograph taken by Diana Baker Woodall ©2007 Source: DianasDesserts.com Click here to view recipe and photo of Passover Haroset on Diana's Desserts Website 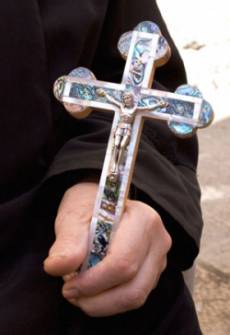
Eastern Orthodox Easter (Greek and Russian Easter)Eastern Orthodox Easter is observed on Sunday April 27, 2008 (Both Greek and Russian Orthodox) The Great Easter Date DebateEaster is the commemoration of Jesus' resurrection, universally celebrated by Christians around the world. Although how and even when Easter is celebrated varies greatly. Both Western Churches (Roman Catholic and Protestant) and Eastern Churches (Greek and Russian Orthodox) celebrate Easter on the first Sunday following the first full moon after the vernal equinox. There are as many as five weeks between the two Easter celebrations. In the Western Church, Easter falls between late March and late April; in the Orthodox Church, it is between early April and early May. In the 16th century, the Roman Church abandoned the Julian Calendar in favor of the Gregorian calendar. As a result, Catholic (and eventually Protestant) churches need to convert the originally Julian-based date of Easter into a Gregorian date. Even still, it would stand to reason that the date would be the same for the two Churches, since both are based on the same Julian calendar-at least originally. However, the two Churches also use a different system for calculating the date of the vernal equinox. The Western Church decided to set a fixed date-March 21-for the vernal equinox and then define the full moon using ecclesiastical calculations. The Orthodox Church, on the other hand, set the date for Easter based on the astronomical definitions of the full moon and the equinox, as they are observed along the meridian of Jerusalem. While the Easter date debate is the most commonly cited difference between Eastern and Western Christianity, there are many other differences, as well. From the timing and content of the Easter Mass to traditional foods served at Easter, the two Churches bring their own unique take on celebrating Easter. 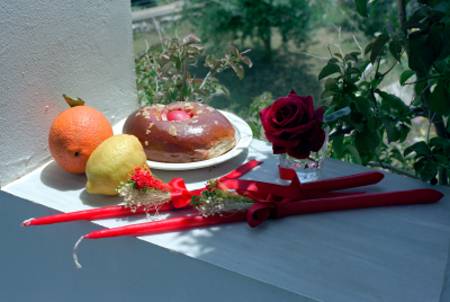
Greek Orthodox EasterApril 27, 2008 Greek Orthodox Easter CustomsIn Greece, the actual Easter festival begins several days before Easter. Preparations begin on Holy Thursday, when the tsoreki, or Easter bread, is baked, and the eggs are dyed red, symbolizing the blood of Christ. Many Orthodox fast in the days leading up to Easter, restricting themselves from meat, butter, milk and olive oil. Most also go to their priest to make their confessions and partake in the Holy Communion. On Good Friday, the church's priest or monk takes down the icon of Christ from the cross and wraps it in linen, reenacting the ancient burial rituals. The icon is then placed in a casket surrounded by white lilies, and paraded through the town as worshipers lament the death of Christ. On Holy Saturday, parishioners attend late night mass, bringing with them unlit candles. As the clock strikes midnight, the priest announces joyously, "Christos anesti" or "Christ Has Risen". Worshipers light their unlit candles from the church's Holy Flame, which is said to be have taken from Jesus' nativity cave in Jerusalem. The Pre-Easter fast ends with this lighting ceremony, so worshipers quickly return home to enjoy a feast meal. The soot from the burning candles is often used to make the sign of a cross upon a home's threshold. A cross from the Holy Flame candles is thought to protect the home and its inhabitants during the coming year. Easter Sunday is considered a festive day of rejoicing with friends and family. The traditional meal is roasted lamb-symbolizing Jesus, the Lamb of God-and dyed eggs. Greeks have an egg cracking tradition, known as tsougrisma, which is somewhat akin to American's wishbone tradition on Thanksgiving. In Greece, friends and neighbors crack their eggs against one another's to see who ends up with the whole egg. The one holding the last whole egg is deemed the lucky one. Making the feast even more jovial is the free flowing Greek wines and ouzo, which often help these meals last well into the night. Many of these colorful traditions are practiced today not only in Greece, but in America and other countries around the world with growing Greek immigrant communities. Whether new immigrant or third-generation, the Greek community abroad is strong-and nothing brings out that Greek pride more than the Easter celebrations. 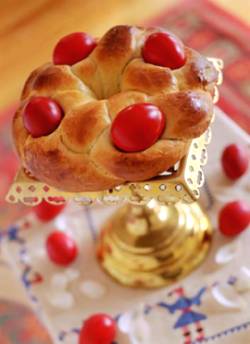
Tsoureki (Greek Easter Bread)Servings: Makes 3 loafs Comments: This braided bread can be shaped either into a circle or into two large braids and sprinkled with sesame seeds (sesame seeds are not always used and are not used in this recipe. You may add them if you like). The loaves are often adorned with beautiful red Easter eggs and sometimes red rosebuds for decorations. The Easter eggs are dyed deep red to represent the blood of Christ, the eggs also represent new life and springtime. It is traditionally eaten during the Resurrection Meal. After 40 days of fasting - as is dictated by the Greek Orthodox Church (but rarely followed as strictly by the general population any longer) - the Easter feast has to begin slowly, with a light meal after the midnight liturgy on Saturday night. The fast is generally broken with Magiritsa, an offal-based soup flavored with avgolemono sauce; Tsoureki, the fluffy, egg-laden Easter bread, salad and a bowl of red dyed eggs. Greeks have a custom when it comes to the eggs: they crack them one-to-one. Whomever's egg remains in tact, supposedly has good luck in the ensuing year. This bread recipe was traditionally prepared with an essence drawn from the seeds of Mediterranean wild cherries, called Makhlepi, which makes the kitchen smell delicious. The kernels of the Makhlepi cherry spice are loved for specialties like Tsoureki, but some people at times may elect to prepare this beautiful bread without the seed essence. Besides mahaleb kernels, the bread can be flavored with Mastic, the resin from Pistacia lentiscus, var. chia which is used in Greek cuisine. In more recent years, vanilla-scented Tsoureki has also become quite popular. Sometime Tsoureki is used as gifts for special occasion, for instance, it can be given as an Easter gift from children to their godparents. This braided, sweet bread is found in all Greek shops and homes during the Easter Holiday. Ingredients: 2 envelopes (1/2 oz./14 grams/4 1/2 tsp.) active dry yeast 1/2 cup warm water 1 cup (2 sticks/8 oz./226g) unsalted butter 1 1/4 cups granulated sugar PLUS 1 tablespoon 5 eggs 2 cups warm milk 10 cups all-purpose flour 1/2 tsp. ground mastic OR mahlepi (also spelled makhlepi)* (See Notes Below) Optional: Red dyed hard boiled Easter Eggs Instructions: Dissolve the yeast in the warm water with 1 tbsp. sugar, set it aside to ferment and proof, about 10 minutes. Cream the butter and sugar in a large bowl until it is light. Beat in four of the eggs, one at a time, beating with each addition. On low speed, slowly pour in the warm milk. Add 1 cup of the flour and the mahlepi and mix into the other ingredients. Then add the dissolved yeast and slowly start adding the remaining flour. When the mixture gets too thick to stir, remove it from the mixer. Dip both your hands into flour so they don’t get sticky, and start kneading the dough by hand, until all the flour is incorporated. It should be pliable and smooth, not stiff. Cover the dough with a smooth cloth towel and set it in a warm place to rise, about 1 hour, until it is double in bulk. Knead it again for 1 minute and then set it aside to rise once more. Knead the dough again for 1 minute, and then divide it into 12 balls (each ball being the size of an orange). This will yield you 4 loaves. Roll each ball on a floured board into a rope 1 1/2 to 2 inches thick and 15 to 20 inches long. Take three ropes, and press the edges of the ropes together and tuck the end under the loaf. Braid the length of the ropes and when finished, press the other end together and tuck under the loaf. Set each loaf on a well-greased sheet and cover so they rise again and are doubled in bulk. Preheat oven to 275 degrees F/135 degrees C. Beat the last egg lightly and brush the tops of the braided loaves with it. Bake the loaves for 15 minutes then lower the heat to 250 degrees F/120 degrees C and continue baking until they are golden brown, about 30 minutes. They can be stored in airtight bags or even frozen to enjoy on another day. Makes 3 loafs. *Notes: Mastic can be purchased online at Parthenon Foods. Mastic can also be found at most Middle Eastern markets or Greek food markets. Mahlepi can be purchased at most Greek food markets or online at: greekolivewarehouse.com or at greekshops.com. Variation: For a little variation, you can add pieces of dried orange peel and mix it into the dough. If you would like to get more decorative with your Tsoureki, you can push hard-boiled, dyed eggs into the loaf right before it is baked. They make the loaves that much more festive. Click here to view recipe and photo of Tsoureki (Greek Easter Bread) on Diana's Desserts Website 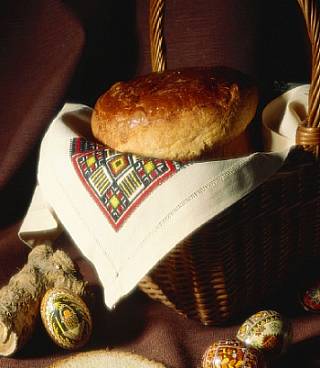
Russian Orthodox EasterSunday April 27, 2008 Russian Orthodox Easter CustomsEaster is the predominant springtime feast celebrated by the Russian Orthodox. For religious Russians, the entire Lenten Season, referred to as the Quadragesima, has a markedly different feel than normal, day-to-day life. Historically, all theatre and music performances were banned during Lent, as they were considered distraction from the Lenten proscription to reflect and repent. Today, these public restrictions have lessened, although many individuals still maintain a strict adherence to the requirements of Lent, including not eating meat, eggs or other animal products during the 40 day "fast". Holy week, beginning with Palm Sunday, is a time of great activity in Russian homes, including spring cleaning and baking Easter bread. On Holy Thursday, Russians paint their Easter eggs using their traditional method of boiling onion peels and scraps of silk together with the eggs. Painted eggs are a universal symbol of Easter, but in Russia they take on even greater significance. Russian Easter eggs are believed to possess magical powers-from protecting crops to warding off evil spirits. Many hide an Easter egg in the foundation of their home, believing that it will bring prosperity. On Holy Saturday, a strict day fasting in which no food may be eaten at all, families are nonetheless busy preparing for the Easter feast. The feast, served to break the fast after the midnight mass, includes the Paskha Easter cake, baked on Holy Saturday. Like in Greece, Easter Mass in Russia is held on Saturday night. Worshipers congregate in a totally darkened church, which symbolizes the despair of a world without faith in Jesus Christ. Historically, the eve of Holy Saturday was considered a haunted time, in which satanic creatures tormented townsmen. People were afraid to go out after dark, but persevered to attend Mass, since Church was considered a safe haven. As midnight approaches, worshipers light candles and then, at the strike of 12 o'clock, church bells announce the resurrection of Christ. An intensely joyful Orthodox liturgical chant can be heard throughout the streets of Russia until the conclusion of Easter Mass at dawn. Worshipers return to their homes for a long family feast. Tables are traditionally decorated with fresh flowers and painted eggs. In addition to the Easter bread and Paskha cake, foods prohibited during the 40 Day Fast, such as sausage, bacon, cheese and milk, are also served. After breakfast, people go out to visit friends and neighbors, bringing with them baskets of painted eggs and Easter breads to exchange. An old Russian fable tells that an Easter egg given from the heart will never spoil. People also visit cemeteries, bringing eggs, bread and even beer to their deceased relatives. Like the egg cracking game in Greece, Russians also have a game they play with eggs on Easter. Children line up at the top of a hill and roll their eggs down, with the aim of keeping their egg intact while breaking their opponents' eggs. Many of these beautiful Orthodox customs are now practiced in America and elsewhere around the world, as Orthodox churches have sprung up to meet the needs of immigrant communities. Perhaps this spring, you can visit an Orthodox church or community to experience the magic of an Eastern Easter. Source for information on Eastern Orthodox Easter: Holidays on the Net: http://www.holidays.net/ 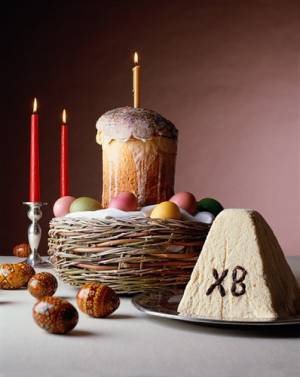
Russian Easter Bread (Kulich)Servings: Makes 2 loaves Comments: A cross between brioche and challah, this bread (called kulich or babka) is a lightly sweetened, egg-glazed cylinder, often baked in a coffee can to make a tall loaf. The loaf would sit proudly in the center of the family Easter basket, surrounded by meats, cheeses, butter, and eggs. It's a central part of the Russian Easter meal, served with Sweet Paskha Cheese* (See recipe for Sweet Paskha Cheese on this website under Easter category), or unsalted butter. Ingredients: 1 cup whole milk 1/2 cup sugar plus a pinch 3/4 cup (1 1/2 sticks/6 oz./170g) unsalted butter Pinch of saffron threads, crumbled 2 teaspoons salt 2 1/2 teaspoons (1/4 oz./7g) active dry yeast 1/4 cup lukewarm water (105 to 115 degrees F/40 to 46 degrees C) 6 cups all-purpose flour plus additional for dusting 4 large eggs Confectioners' Sugar Glaze: (optional-see recipe below) Special equipment: 2 (5 to 6-cup) soufflé dishes or 2 (2 pound) cleaned empty coffee cans. Instructions: For the Dough: Heat milk, sugar, butter, saffron, and salt in a 1-quart heavy saucepan over moderate heat, stirring occasionally, until butter is melted and sugar is dissolved, about 2 minutes. Remove from heat and cool to lukewarm. Meanwhile, stir together yeast, warm water, and pinch of sugar and let stand until foamy, about 5 minutes. (If mixture doesn't foam, discard and start over with new yeast.) Put flour in a large bowl and make a large well in center. Lightly beat 3 eggs and add to well along with milk and yeast mixtures. Carefully stir together with a wooden spoon, gradually incorporating flour, until a soft dough forms. Transfer dough to a lightly floured surface and knead, dusting with just enough flour to keep dough from sticking, until smooth and elastic, about 10 minutes. Put dough in a lightly oiled large bowl, turning to coat with oil, and let rise, covered with a clean kitchen towel, in a draft-free place at warm room temperature until doubled in bulk, about 3 hours. Punch down dough and let rise again, covered with towel, until doubled in bulk, about 1 hour. For the Loaves: Generously butter soufflé dishes. Punch down dough and divide in half. Loosely wrap 1 piece in plastic wrap and set aside. Cut away one third of remaining piece of dough and reserve, then roll remaining two thirds into a large ball and transfer to a soufflé dish. Roll reserved piece of dough into an 18-inch-long rope on work surface with palms of your hands. Cut rope into 3 equal pieces and lay pieces vertically side by side on work surface, about 1/4 inch apart. Gather 3 ends farthest from you and press them together, then braid strands, pressing together other ends to secure braid. Lay braid over top of dough in soufflé dish (trim braid if using coffee cans). Form another loaf with remaining dough in same manner. Cover loaves with clean kitchen towel and let rise in draft-free place at warm room temperature until doubled in bulk, about 1 1/2 hours (loaves will rise about 1 inch above rims of dishes). Baking the Loaves: Put oven rack in middle position and preheat oven to 350 degrees F/180 degrees C. Lightly beat remaining egg with a large pinch of salt, then brush egg over top of each loaf. Bake loaves until golden brown and bread sounds hollow when tapped on bottom, about 1 hour. Turn loaves out onto a rack, then turn right side up and cool completely. When loaves have completely cooled, if desired, drizzle with glaze (see recipe below). Makes 2 loaves. Note: Raisins and/or candied fruit or slivered almonds may be added to the dough, if desired. Also, if you'd like to make a confectioners' sugar glaze to drizzle over the tops of the loaves, see recipe below. Tips: Cover the bread with aluminum foil as soon as it starts to brown, and cover the loaves with a damp dish towel for 10 minutes as soon as they come out of the oven. Bread can be made 1 day ahead and kept, wrapped in plastic wrap, at room temperature or frozen 2 weeks. Confectioners' Sugar Glaze Ingredients: 1 cup sifted confectioners' sugar (icing sugar) 4 tsp. fresh lemon juice 1/4 tsp. almond extract Instructions: Whisk together the sifted confectioners' sugar, lemon juice, almond extract, and 2 - 4 teaspoons of water (or enough to make a pourable glaze) in a bowl. Set the kulich on a plate and drizzle the glaze over it, letting the glaze drip down the sides. Let the kulich stand until the glaze has hardened and then transfer it to a serving plate. Click here to view recipe and photo of Russian Easter Bread (Kulich) on Diana's Desserts Website 
Russian Sweet Paskha Cheese for EasterServings: Makes 10-12 servings Comments: The sweetness and creaminess of this cheese celebrate the breaking of the traditional Russian dairy-free fast that precedes Easter and provide a nice contrast to the salty meats and bold flavors of the rest of the holiday menu. Spread it on a slice of Russian Easter Bread for a sweet and delicious flavor. Ingredients: 1/3 cup brandy 1 cup loosely packed golden raisins (5 oz./141g) 2 pounds (16 oz./453g) pot cheese or farmer cheese* (see note below) 2 hard-boiled large egg yolks (reserve whites for another use if desired) 1/2 cup (1 stick/4 oz./113g) unsalted butter, softened 3/4 cup granulated sugar 1 cup sour cream 2 teaspoons vanilla extract 1/4 teaspoon salt 1 cup chilled heavy cream Garnish: Candied Fruit (optional) Special equipment: A wooden paskha cheese mold** (see notes below) or a clean 2-quart terra-cotta flowerpot with a drainage hole and a plate slightly smaller than top of pot; cheesecloth; 2 lb of weights such as large soup or vegetable cans. Instructions: Heat brandy with raisins in a small saucepan over low heat until warm, then remove from heat and let steep until raisins are softened, about 15 minutes. Force cheese and yolks through a potato ricer or a medium-mesh sieve into a bowl. Beat together butter and sugar in a large bowl with an electric mixer at medium speed until pale and fluffy, about 2 minutes. Add cheese mixture, sour cream, vanilla, and salt and beat until just combined. Beat cream in a bowl with cleaned beaters until it holds soft peaks. Fold whipped cream and raisins with any remaining brandy into cheese mixture gently but thoroughly. Line mold (or flowerpot) with a single layer of cheesecloth, leaving a 2- to 3-inch overhang on all sides. Spoon cheese mixture into mold, then fold ends of cheesecloth over top. Put lid on cheesecloth, then put weights on lid (or on foil and small plate if using flowerpot). Chill mold on a large plate (to catch drips) at least 24 hours. Remove lid from mold and open cheesecloth. Invert a serving plate over top of mold and invert mold onto plate. Unlock hinges and open mold, removing cheesecloth. Loosely cover cheese with plastic wrap and let stand at room temperature 30 minutes. Sweet Paskha Cheese may be decorated with candied fruit, if desired. Notes: Paskha can be chilled in mold up to 3 days. Makes 10-12 servings. *Farmer cheese or pot cheese is available at some supermarkets and many cheese shops. **Wooden paskha cheese molds may be purchased from Toroney's Custom Woodwork and Church Supply (610-942-3506) Click here to view recipe and photo of Russian Sweet Paskha Cheese for Easter on Diana's Desserts Website 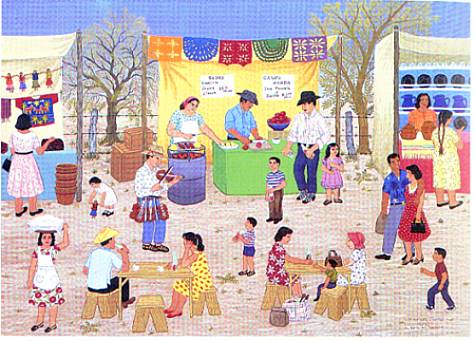
Cinco de MayoMay 5, 2008 The holiday of Cinco De Mayo, The 5th Of May, commemorates the victory of the Mexican militia over the French army at The Battle Of Puebla in 1862. It is primarily a regional holiday celebrated in the Mexican state capital city of Puebla and throughout the state of Puebla, with some limited recognition in other parts of Mexico, and especially in U.S. cities with a significant Mexican population. It is not, as many people think, Mexico's Independence Day, which is actually September 16. The battle at Puebla in 1862 happened at a violent and chaotic time in Mexico's history. Mexico had finally gained independence from Spain in 1821 after a difficult and bloody struggle, and a number of internal political takeovers and wars, including the Mexican-American War (1846-1848) and the Mexican Civil War of 1858, had ruined the national economy. During this period of struggle Mexico had accumulated heavy debts to several nations, including Spain, England and France, who were demanding repayment. Similar debt to the U.S. was previously settled after the Mexican-American War. France was eager to expand its empire at that time, and used the debt issue to move forward with goals of establishing its own leadership in Mexico. Realizing France's intent of empire expansion, Spain and England withdrew their support. When Mexico finally stopped making any loan payments, France took action on its own to install Napoleon III's relative, Archduke Maximilian of Austria, as ruler of Mexico. France invaded at the gulf coast of Mexico along the state of Veracruz and began to march toward Mexico City, a distance today of less than 600 miles. Although American President Abraham Lincoln was sympathetic to Mexico's cause, and for which he is honored in Mexico, the U.S. was involved in its own Civil War at the time and was unable to provide any direct assistance. Marching on toward Mexico City, the French army encountered strong resistance near Puebla at the Mexican forts of Loreto and Guadalupe. Lead by Mexican General Ignacio Zaragoza Seguin, a smaller, poorly armed militia estimated at 4,500 men were able to stop and defeat a well outfitted French army of 6,500 soldiers, which stopped the invasion of the country. The victory was a glorious moment for Mexican patriots, which at the time helped to develop a needed sense of national unity, and is the cause for the historical date's celebration. Unfortunately, the victory was short lived. Upon hearing the bad news, Napoleon III had found an excuse to send more troops overseas to try and invade Mexico again, even against the wishes of the French populace. 30,000 more troops and a full year later, the French were eventually able to depose the Mexican army, take over Mexico City and install Maximilian as the ruler of Mexico. Maximilian's bullet riddled shirt on display Maximilian's rule of Mexico was also short lived, from 1864 to 1867. With the American Civil War now over, the U.S. began to provide more political and military assistance to Mexico to expel the French, after which Maximilian was executed by the Mexicans - his bullet riddled shirt is kept at the museum at Chapultepec Castle in Mexico City. So despite the eventual French invasion of Mexico City, Cinco de Mayo honors the bravery and victory of General Zaragoza's smaller, outnumbered militia at the Battle of Puebla in 1862. Today's CelebrationFor the most part, the holiday of Cinco de Mayo is more of a regional holiday in Mexico, celebrated most vigorously in the state of Puebla. There is some limited recognition of the holiday throughout the country with different levels of enthusiasm, but it's nothing like that found in Puebla.Traditional Mexican dancers Celebrating Cinco de Mayo has become increasingly popular along the U.S.-Mexico border and in parts of the U.S. that have a high population of people with a Mexican heritage. In these areas the holiday is a celebration of Mexican culture, of food, music, beverage and customs unique to Mexico. Commercial interests in the United States and Mexico have also had a hand in promoting the holiday, with products and services focused on Mexican food, beverages and festivities, with music playing a more visible role as well. Several cities throughout the U.S. hold parades and concerts during the week following up to May 5th, so that Cinco de Mayo has become a bigger holiday north of the border than it is to the south, and being adopted into the holiday calendar of more and more people every year. Source: Mexonline.com Cinco de Mayo TreatsTres Leches Cake with Mango GarnishServings: 16 Comments: I like to make this rich and easy to prepare Tres Leches (Three Milks) cake to celebrate the Mexican holiday of Cinco de Mayo but it can be made for any occasion. I used fresh mango slices for the garnish but you can use any fresh (or canned) fruit of your choice. Sliced peaches are also good or even sliced pineapple is delicious. Use your imagination. If desired, a small amount (1/8 to 1/4 cup) of brandy, rum or Frangelico (hazelnut liqueur) can be added to the Soaking Syrup for a more sophisticated flavor. Ingredients: Cake: 1 1/2 cups all-purpose flour 1 1/2 tsp. baking powder 1 cup granulated sugar 1/2 cup (1 stick/4 oz./113g) butter 5 eggs 1 1/2 tsp. vanilla extract Three Milks Soaking Syrup: 1 cup milk or heavy cream 1 can (14 oz.) sweetened condensed milk 1 can (5 oz.) evaporated milk Topping: 2 cups frozen non-dairy whipped topping, thawed OR: 1 cup heavy cream, whipped Garnish: Sliced fresh mango (or fruit of your choice) Maraschino cherries Instructions: Preheat oven to 350 degrees F/180 degrees C. Spray the bottom and sides of a 9 x 13-inch baking dish with cooking spray. Combine flour and baking powder; set aside. Beat sugar and butter in a large bowl with electric mixer on medium speed until light and fluffy. Add eggs one at a time, beating well after each addition. Add vanilla. Gently fold in flour mixture (do not overmix). Pour into prepared baking dish. Bake in preheated oven for 29 to 32 minutes or until toothpick inserted in center comes out clean. Pierce warm cake with large fork at 1/2-inch intervals. Mix together milk (or heavy cream, if using), condensed milk and evaporated milk; pour slowly over top of cake (milk mixture will slowly be absorbed by the cake). Cool completely at room temperature, cover with plastic wrap and refrigerate for 2 to 3 hours or up to 1 day. Frost cake with whipped topping (or whipped cream, if using) and garnish with fruit before serving. Cut into squares and serve. Store leftover cake in the refrigerator. Makes 16 servings. Photograph taken by Diana Baker Woodall© 2006 Click here to view recipe and photo of Tres Leches Cake with Mango Garnish on Diana's Desserts Website 
Classic MargaritaServings: 4 servings Comments: A margarita made with freshly squeezed limes and good-quality tequila is a simple pleasure you can easily enjoy at home. Having an easy to use (and easy to clean) citrus juicer makes juicing a bag of limes quick and effortless! Kick your feet up this weekend, relax, and take your sweet time sipping a slushy blended margarita with a side of corn tortilla chip and salsa. Or enjoy a thirst-quenching margarita on the rocks as you sit down to your Cinco de Mayo feast. Either way, serving margaritas in their signature wide-mouth, long stem glasses adds to the festive and indulgent pleasure! Ingredients: Salt 1 cup white tequila 3/4 cup Contreau or Triple Sec (both are orange liqueurs) 1 cup fresh lime juice 1 tablespoon sugar Ice cubes Instructions: 1. Rub the rims of the cocktail glasses with lime, then dip in salt to frost. 2. Combine first 4 ingredients in a 4-cup measuring cup. 3. For Blended Margaritas: Fill blender halfway with ice cubes. Add half of margarita mixture. Blend until mixture is thick and icy. Divide between two glasses. Repeat with more ice cubes and remaining margarita mixture. 4. For Margaritas On the Rocks: Fill four glasses with ice cubes. Divide margarita mixture among glasses and serve. Do-Ahead Tip: Margarita mixture can be made up to 8 hours ahead and prior to being blended with ice. Cover and refrigerate. Makes 4 servings. Source: DianasDesserts.com Click here to view recipe and photo of Classic Margarita on Diana's Desserts Website 
Mother's DayCelebrated on Sunday May 11, 2008 The History of Mother's DayThe earliest Mother's Day celebrations can be traced back to the spring celebrations of ancient Greece in honor of Rhea, the Mother of the Gods. During the 1600's, England celebrated a day called "Mothering Sunday". Celebrated on the 4th Sunday of Lent (the 40 day period leading up to Easter*), "Mothering Sunday" honored the mothers of England. During this time many of the England's poor worked as servants for the wealthy. As most jobs were located far from their homes, the servants would live at the houses of their employers. On Mothering Sunday the servants would have the day off and were encouraged to return home and spend the day with their mothers. A special cake, called the mothering cake, was often brought along to provide a festive touch. As Christianity spread throughout Europe the celebration changed to honor the "Mother Church" - the spiritual power that gave them life and protected them from harm. Over time the church festival blended with the Mothering Sunday celebration . People began honoring their mothers as well as the church. In the United States Mother's Day was first suggested in 1872 by Julia Ward Howe (who wrote the words to the Battle hymn of the Republic) as a day dedicated to peace. Ms. Howe would hold organized Mother's Day meetings in Boston, Mass ever year. In 1907 Ana Jarvis, from Philadelphia, began a campaign to establish a national Mother's Day. Ms. Jarvis persuaded her mother's church in Grafton, West Virginia to celebrate Mother's Day on the second anniversary of her mother's death, the 2nd Sunday of May. By the next year Mother's Day was also celebrated in Philadelphia. Ms. Jarvis and her supporters began to write to ministers, businessman, and politicians in their quest to establish a national Mother's Day. It was successful as by 1911 Mother's Day was celebrated in almost every state. President Woodrow Wilson, in 1914, made the official announcement proclaiming Mother's Day as a national holiday that was to be held each year on the 2nd Sunday of May. While many countries of the world celebrate their own Mother's Day at different times throughout the year, there are some countries such as Denmark, Finland, Italy, Turkey, Australia, and Belgium which also celebrate Mother's Day on the second Sunday of May. Source: Holidays on the Net Mother's Day GoodiesNote: Any of these wonderful desserts can be made for Mother's Day or for Father's Day (which will be coming up on Sunday June 15). 
Miniature Victoria Sponge Heart CakesServings: Makes 12 sandwiched cakes Comments: These would make a delicious Mother's Day or Valentine's Day dessert, or they would be lovely to serve at an afternoon tea or would make a great addition to any brunch menu. Raspberry jam, apricot jam, or even lemon curd would also work well for a filling for these sweet little heart cakes. Ingredients: For the Cakes: 1 (18.25 oz.) box yellow or white cake mix 1 cup sour cream 4 eggs, beaten 1/3 cup vegetable oil 1/4 cup water For the Strawberry Jam Filling: 1 1/2 cups strawberry jam or lemon curd (or any other jam, preserves or curd of your choice) For the Vanilla Buttercream Filling: 1/3 cup (5 tbsp./3 oz./75g) unsalted butter, at room temperature 2/3 cup confectioners' sugar 3 to 4 tablespoons milk 1/2 teaspoon vanilla extract For Garnish: Confectioners' sugar Fresh strawberries Instructions: 1. Preheat oven to 350 degrees F/180 degrees C. Grease and flour two (6-cavity) mini heart pans (I used two 6-cavity mini heart pans made by Wilton), OR alternately spray pans with non-stick baking spray with flour. 2. Combine all cake ingredients in bowl of an electric mixer and beat for thirty seconds on low speed, then beat two minutes on medium speed. Divide batter between each mini heart cavity and bake in preheated oven for 15 to 18 minutes (you will probably have some batter left over), until a cake tester inserted in center of cakes come out clean. Place cake pans on cooling racks. Let cakes cool in pans for 10 to 15 minutes. Remove cakes from pans and let cakes cool completely. 3. To Make Vanilla Buttercream Filling: Combine butter, confectioners' sugar, 2 tablespoons milk and vanilla in a large mixing bowl. Beat with electric mixer at low speed until blended. Beat at high speed until light and fluffy, adding more milk, 1 teaspoon at a time, as needed for good spreading consistency. 4. Once cakes have cooled completely, cut each individual heart cake in half horizantally. You will now have 24 mini heart cake halves. 5. Spread 2 tablespoons jam (or lemon curd, if using) on one side of each heart shaped mini cake, then spread 2 tablespoons of the buttercream icing on one side of another mini cake half. Sandwich the two cake halves together and repeat this procedure with remaining heart cake halves. Place cakes on serving plates and dust top of each cake heavily with confectioners' sugar. If desired, garnish each cake with a strawberry half. Serve cakes at room temperature. Store any uneaten cakes in the refrigerator, wrapped tightly in plastic wrap. Makes 12 sandwiched mini heart cakes. Note: You can purchase the Wilton 6-Cavity Mini Heart Pans at Wilton.com, or at Amazon.com and at other stores online. Source: DianasDesserts.com Photograph taken by Diana Baker Woodall ©2007 Click here to view recipe and photo of Miniature Victoria Sponge Heart Cakes on Diana's Desserts Website 
Sunny Chiffon Cake with Lemon GlazeServings: 12 Comments: This lovely chiffon cake flavored with lemon and a little vanilla makes a wonderful dessert for celebrating the beginning of Spring, or makes a refreshing after dinner treat after a warm summer's day. It would also be especially nice served on Mother's Day or Father's Day as a special homemade dessert for Mom or Dad, or why not serve it at brunch or at an afternoon tea. Your Mom and Dad, or if serving for guests, will adore you for making them this light and delicious cake. Ingredients: For the Cake: 2 cups all-purpose flour 1 1/2 cups granulated or superfine sugar 1 tablespoon baking powder 1/2 teaspoon salt 3/4 cup cold water 1/2 cup extra virgin olive oil* (see note below) 7 egg yolks, beaten 1 teaspoon vanilla extract 2 teaspoons grated lemon peel 7 egg whites 1/2 teaspoon cream of tartar OR 1/2 teaspoon lemon juice For the Lemon Glaze: 1/4 cup (1/2 stick/2 oz./56g) unsalted butter 2 cups confectioners' sugar 1-2 tablespoons fresh lemon juice Zest of 1 lemon 1/8 teaspoon salt 1 teaspoon vanilla extract 2-4 tablespoons water (if needed to thin out the glaze) For Garnish: (optional) Lemon slices and mint sprigs Instructions: For the Cake: Preheat oven to 325 degrees F/160 degrees C. Line the bottom of a 10-inch tube pan with parchment paper, baking paper or waxed paper. Set aside. Combine flour, sugar, baking powder, and salt in bowl of an electric mixer. Add water, oil, beaten egg yolks, vanilla extract, and lemon peel. Attach wire whip to mixer. Turn mixer to medium and beat 1 minute, scrape bowl, continue to mix on medium speed and beat another 15 seconds. Pour mixture into another bowl. Clean mixer bowl and wire whip (make sure that there is no grease in the mixer bowl or on the wire whip or your egg whites will not whip correctly). Place egg whites and cream of tartar (or lemon juice) in clean mixer bowl. Attach bowl and wire whip to mixer. Turn mixer to medium-high speed and whip 2 to 2 1/2 minutes, or until egg whites are stiff but not dry. Remove bowl from mixer. Gradually add flour mixture to egg whites. Fold in gently with spatula, just until blended. Pour batter into lined baking pan. Bake in preheated oven for 60-65 minutes, or until top springs back when lightly touched, and a toothpick inserted in the center comes out clean. Remove cake from oven, and invert (while still in pan) onto a cooling rack. Let cool completely in pan upside down for 1 to 1 and a half hours. Turn pan right-side up and take a thin knife and slide it around the cake to detach it from the pan, pressing the knife against the pan to avoid tearing the cake. Using the same technique, detach the cake from the center tube. Pull the tube upward to remove the cake from the pan sides. Slide the knife under the cake to detach it from the bottom. Invert, and allow the cake to drop onto your hand, a rack, or a serving platter. Invert again, right side up, on a rack to cool completely before glazing the cake. For the Glaze: Melt the butter in the top of a double boiler over low heat. Remove from heat and stir in the confectioners' sugar, lemon juice, lemon zest and salt. Return the pan to heat and cook over barely simmering water for 5 minutes, stirring occasionally. Remove pan from heat and add vanilla extract. Add 2-4 tablespoons of water to glaze, if needed, to thin it out. Beat mixture with hand mixer or an electric stand mixer until cool. Drizzle or spread over cake. Let glaze set on cake before serving. If desired, decorate cake with fresh lemon slices and mint sprigs. Makes 12 servings. Note: I use Extra Virgin Olive Oil from the Provence area of France when making this cake. It is a good oil for baking desserts, but you can use regular vegetable oil if you don't have extra virgin olive oil from France. Photograph taken by Diana Baker Woodall © 2002 Source: DianasDesserts.com Click here to view recipe and photo of Sunny Chiffon Cake with Lemon Glaze on Diana's Desserts Website 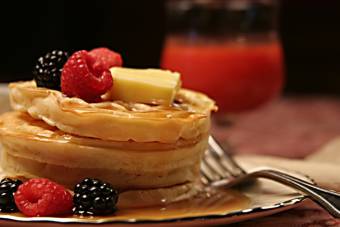
Mother's Day or Father's Day Brunch Time WafflesServings: Makes 8-10 waffles Comments: In the United States waffles are traditionally served warm with butter and pure maple syrup. Also, topping waffles with sliced strawberries or whole blueberries or raspberries and whipped cream is a popular chocie. Try any combination of toppings that appeal to you and your family. Waffles are a wonderful brunch idea. Serve with a glass of juice or tea or coffee. Making these scrumptious waffles is a lovely way to say "Happy Mother's Day" to your special Mom. Ingredients: Waffle Batter: 2 cups all-purpose flour Pinch of salt 1/4 cup confectioners' sugar 1 cup water 2 eggs, separated 4 tbsp. (1/2 stick/4oz/56g) unsalted butter, melted 1 cup milk Choices of Toppings for Waffles: Pure Maple Syrup Butter Sweetened whipped cream Fresh fruit (such as strawberries, raspberries, blueberries, sliced peaches, etc.) Instructions: Preheat a waffle iron according to the manufacturer’s instructions. In a bowl, combine the flour, salt, confectioners’ sugar, water and egg yolks and whisk to mix well. Add the butter and whisk until a smooth paste forms. Add the milk and whisk until blended. In another bowl, whisk the egg whites until stiff peaks form. Using a spatula, fold the whites into the flour mixture until just blended. Cook the waffles according to the manufacturer's instructions until brown and crisp. Serve warm with butter, maple syrup, whipped cream or fresh fruit. Makes 8 to 10 waffles. Source: DianasDesserts.com Click here to view recipe and photo of Mother's Day or Father's Day Brunch Time Waffles on Diana's Desserts Website Food Tips and Information Section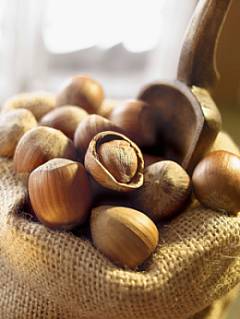
All About HazelnutsHazelnuts, sometimes mistakenly referred to as filberts, are sweet, acorn-shaped nuts that are rich in phosphorous, potassium, copper, zinc, magnesium, selenium, dietary fiber, folate, and Vitamin E. Hazelnuts are also an excellent source of plant sterols that are believed to play a role in the prevention of certain diseases, including colon cancer and heart disease. Although the names are often used interchangeably, filberts are actually a cultivated variety of European hazelnut and are slightly larger than other hazelnuts.While the principal hazelnut-producing countries are Turkey, Spain, Italy, and France, they are also grown in the U.S. on hazelnut farms in Oregon and Washington. Wild hazelnuts (also sometimes referred to as cobnuts) grow in temperate regions around the world. The hazelnut has a long, fuzzy outer husk that opens as the nut ripens, revealing a hard, smooth shell. Believed to have originated in Asia, the hazelnut is one of the oldest agricultural food crops, providing a high-quality Protein to humans for thousands of years. Ancient Chinese manuscripts dating back 5,000 years refer to the hazelnut as a sacred food bestowed directly on us by the heavens; and the ancient Greeks and Romans prized hazelnuts for their medicinal properties. Hazelnuts are a nutrient-dense food that provide excellent nourishment as well as culinary diversity. While ancient lore has it that hazelnuts held the cure for everything from baldness to gastrointestinal illnesses, modern research is informing us that nuts, in general, if consumed in moderation, may confer heart healthy benefits. The monounsaturated fats in nuts are believed to lower LDL ("bad") cholesterol levels. When compared with other nuts, hazelnuts have a high vitamin E profile; and current research indicates that the Antioxidant power of vitamin E may play a significant role in preventing coronary heart disease as well as certain kinds of cancer. Varieties Available in-shell and shelled forms, chopped, ground, whole, and roasted or natural, hazelnuts are often used in the baking and confectionery industries. Hazelnuts impart sweet, rich flavor and texture to numerous foods, and are added to many products including cookies, candies, ice cream, breakfast cereals, biscotti, tortes, chocolates, coffee, bread, liqueurs, and spreads. Some other forms of hazelnut include the following: Hazelnut butter is a creamy, smooth spread (like peanut butter) made from roasted hazelnuts that offers a full, sweet flavor to recipes. Hazelnut meal and flour is made from hazelnuts that have been processed into fine particles, and adds texture and flavor to many dishes, and may be added to cake batters, breads, fillings. Hazelnut oil is a delicacy derived mainly from Italian hazelnuts and is pressed from hazelnuts that have not been roasted. Full of flavor, hazelnut oil is excellent for seasoning desserts as well as salads, sauteed foods, and crepes. Make sure to store hazelnut oil in the refrigerator as it easily turns rancid if exposed to heat and light. Hazelnut paste, with added natural sweeteners, is used as a confectionery paste in hazelnut marzipan, icings, bakery fillings, ice cream, and cookies. Shopping for Hazelnuts If purchasing hazelnuts in the shell, look for shells that are full and heavy. Old nuts will start to dry in the shell, making them lighter. If purchasing shelled nuts, look for skins that are tight and nuts that are plump. Shop at a store with a brisk turnover to get the freshest nuts possible. Storage Fresh hazelnuts are delicate and perishable. Shelled hazelnuts, in particular, should be eaten as soon as possible and kept at room temperature, away from heat and humidity. Shelled hazelnuts may be kept in the refrigerator or freezer for up to four months. Unshelled hazelnuts may be stored in a dry, cool place for up to one month. Preparation The dark skin of hazelnuts is slightly bitter and can be removed by toasting the nuts in a 350 degree F/180 degree C oven for 10 to 15 minutes until their skins begin to crack (this will happen to some but not all of the nuts, so don't worry and don't wait for all of them to crack). Transfer the hot nuts to a kitchen towel and vigorously rub to remove most of the skin. Some skin will remain; that's fine. Let the nuts cool before proceeding with the recipe. While you're in the process, if you want to skin more nuts than you'll need at the moment, do so and either refrigerate or freeze the skinned nuts. If you're baking a cake or cookies, and your recipe calls for ground nuts, place them in a food processor with a little of the flour in the recipe and process; this way they'll grind without becoming oily and pasty. Nutrition Chart Hazelnuts/1 ounce Calories: 179 Total Fat (g): 18 Saturated fat (g): 1.3 Monounsaturated fat (g): 14 Polyunsaturated fat (g): 1.7 Dietary fiber (g): 1.7 Protein (g): 4 Carbohydrate (g): 4 Cholesterol (mg): 0 Sodium (mg): 1 Vitamin E (mg): 6.8 Folate (mcg): 20 Magnesium (mg): 81 Manganese (mg): 0.6 Potassium (mg): 126 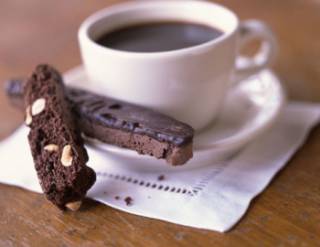
Chocolate Hazelnut BiscottiServings: Makes 30 BiscottiComments: These biscotti (Italian cookies) taste best with a nice hot cup of coffee or espresso. Dunking the biscotti in the coffee is the traditional Italian way of eating these wonderful treats. Ingredients: For the Biscotti: 4 oz. semisweet chocolate, coarsely chopped 1 cup firmly packed light brown sugar 1 3/4 cups unbleached all-purpose flour 1/3 cup unsweetened cocoa, preferably dutch process cocoa 1 1/2 tbsp. instant espresso powder 1 tsp. baking soda 1/4 tsp. salt 3 large eggs 1 1/4 tsp. vanilla extract 1/2 tsp. almond extract 1 cup hazelnuts, toasted and coarsely chopped For the Chocolate Coating: 8 oz. semisweet or bittersweet chocolate, chopped 2 tsp. vegetable shortening Instructions: Preheat an oven to 300 degrees F/150 degrees C. Line a large baking sheet with parchment paper or waxed paper. For the Biscotti: In a food processor fitted with the metal blade, combine the chocolate and brown sugar and process until the chocolate is very fine; set aside. Alternatively, use a blender, processing 1 oz. chocolate and 1/4 cup sugar at a time. Sift together the flour, cocoa, espresso powder, baking soda and salt into a bowl; set aside. In a large bowl, combine the eggs, vanilla extract and almond extract. Using an electric mixer set on medium speed, beat to blend. Reduce the speed to low and mix in the sugar and flour mixtures until a stiff dough forms, adding the hazelnuts when the dough is about half mixed. On a floured surface, divide the dough in half. Form each half into a log 12 inches long. Transfer the logs to the prepared baking sheet, spacing them well apart, and pat to even the shapes. Bake until almost firm to the touch, about 50 minutes (logs will spread during baking). Remove from the oven and let cool for 10 minutes. Leave the oven set at 300 degrees F/150 degrees C. Using a spatula, carefully transfer the logs to a work surface. Using a serrated knife, cut logs on the diagonal into slices 1/2 to 3/4 inch thick. Arrange the slices, cut side down, on the baking sheet. Bake for 25 minutes. Turn the slices over and bake until crisp and dry, about 25 minutes more. Turn off the oven and let the biscotti cool completely in the oven with the door slightly ajar. For the Chocolate Coating: Meanwhile, make the chocolate coating: In the top pan of a double boiler, combine the chocolate and shortening. Place over but not touching simmering water in the lower pan and melt, stirring occasionally, just until smooth. Remove from the heat. Alternatively, melt the chocolate and shortening in a heatproof bowl placed over but not touching simmering water in a saucepan. Dip one side of the cooled cookies in the hot chocolate coating and set, chocolate side up, on a baking sheet. Refrigerate until set. Store in an airtight container in the refrigerator for up to 2 weeks. Makes about 30 biscotti. Click here to view recipe and photo of Chocolate Hazelnut Biscotti on Diana's Desserts Website Until Next TimeI hope you have enjoyed sitting back and reading my newsletter (maybe with a cup of coffee or tea), and that maybe you'll want to make or one or two of these nice desserts for one of the upcoming holidays.I will probably be emailing out my next newsletter in July, with special 4th of July dessert recipes. Until then, have a wonderful and bright spring, and I do hope to hear from some of you with your favorite recipes you'd like to submit to my website. Please click on the link below to Submit a Recipe. Remember, I only post recipes for desserts, breads and beverages. Submit a Recipe Sincerely, Diana Diana's Desserts Diana's Desserts
A Website Dedicated to Home Bakers http://www.dianasdesserts.com E-mail Address: diana@dianasdesserts.com This email was sent to [email]. You can instantly unsubscribe from these emails by |