July 1, 2007 Welcome Home Bakers and Friends,Well here it is July already. Can you believe how fast this year is going? I can't. It seems it was just Christmas a few weeks ago. I guess it's that I'm getting older and it seems everything goes quickly when you reach middle age and older. I wasn't planning to send out my next newsletter until later in the summer, but I thought to myself, this is a good time for some nice dessert and beverage recipes for the 4th of July and just summer in general. Also, see the Food Tips and Information Section below. It's all about Raspberries, a very delicious and healthy fruit. To keep all of you up to date with what's going on with our garden and summer planting, our tomato plants are looking very, very good. In fact, one of them (we have 13 or 14, I've lost count) called Jaune Flamme has 4 little, little green tomatoes on it. Very tiny, but big enough to see. My husband called me out to our patio the other day and said, "look, we've got triplets", but when I got outside, I counted 4, so we actually have quadruplets. I was so surprised, since it seems a bit early for them to be producing, even just starting to produce. Oh, I guess I shouldn't question it, it's NATURE! Our dwarf citrus trees are also looking quite nice. Lots of blossoms, and our Dwarf Satsuma Mandarin Tree has loads of little green balls on it which will become the oranges in around December. Can't wait. My husband also tells me (since I don't "trek" to the outside back of our house too much) that our Pluot tree (plum-apricot combo fruit) has got a lot of fruit on it, but the fruit is still green, so hopefully the pluots will be ready to pick in mid to late July. They are so delicious and sweet. Another, "I can't wait". I will keep you updated on our fruits and vegetables; we are still waiting for the carrots and lettuce and then later, in the Fall, our pumpkins will hopefully be ready to cut off the vines. The weather here in Northern California has gotten quite warm. It's been in the upper 80's and low 90's (30 to 35 degrees C). We've been using the air conditioner a lot and getting into our pool to keep cool. As far as baking goes, I haven't been doing a lot of it. I did make a nice lemon tart recently which was very light and so refreshing. Well, it's on to the recipes. I hope some of you try one or two of them and let me know how they turned out. Enjoy! 
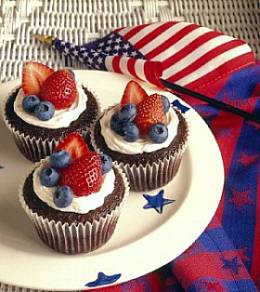
4th of July CupcakesComments:Serve these colorful and scrumptious cupcakes at your 4th of July picnic, barbeque or just make them to have at home. They are so pretty and you can't beat the color of these goodies, the red, white and blue. Tip: Marshmallow creme stabilizes whipped cream; mix it with whipped cream used in other hot-weather desserts, too. Makes 24 cupcakes Ingredients: 1 (18.25 oz.) box devil’s food cake mix with pudding in the mix 1 1/3 cups water 1/2 cup (1 stick/4 oz./113g) margarine, melted 3 eggs 1/2 cup marshmallow creme (from 7 ounce jar) 1 cup heavy cream 3 cups fresh strawberries, halved 1 cup fresh blueberries Instructions Make the cupcakes the day ahead. Prepare and bake as directed on package using water, margarine and eggs. Cool at least one hour or until completely cooled. Cover and refrigerate. Place marshmallow creme in small microwave-safe bowl and microwave on high for 10 – 20 seconds, until softened. Beat heavy cream until soft peaks form. Add slightly cooled marshmallow creme; continue beating until stiff peaks form. Frost cooled cupcakes with whipped cream mixture up to two hours before serving. Arrange 2 strawberry halves on top of each frosted cupcake. Place 3 - 5 blueberries around the strawberry halves. Keep refrigerated until served. Makes 24 cupcakes. Click here to view recipe and photo of 4th of July Cupcakes on Diana's Desserts Website Summer Desserts and Beverages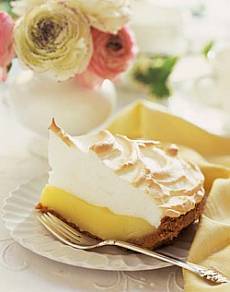
Lemon Meringue Pie with Pecan CrustA great-looking, great-tasting summer pie. Brown sugar enhances the crust.For the Crust: 1 cup all-purpose flour 2/3 cup finely chopped pecans 1/3 cup cake flour 3 tablespoons (packed) golden brown sugar 1/2 teaspoon salt 5 tablespoons chilled unsalted butter, cut into 1/2-inch pieces 3 tablespoons chilled vegetable shortening, cut into 1/2-inch pieces 3 tablespoons (about) ice water For the Lemon Filling: 1 3/4 cups granulated sugar 1/3 cup cornstarch 1 1/2 cups water 1/2 cup fresh lemon juice 5 egg yolks 2 tablespoons grated lemon peel For the Meringue: 5 egg whites 1/2 teaspoon cream of tartar 1/3 cup granulated sugar Instructions To Make Crust: Mix first 5 ingredients in large bowl; add butter and shortening. Using electric mixer, beat at low speed until mixture resembles coarse meal. Add 2 tablespoons ice water. Beat until dough holds together, adding more water by 1/2 tablespoonfuls if dry. Gather dough into ball; flatten into disk. Wrap disk in waxed paper and chill until firm enough to roll, at least 1 hour and up to 1 day. Roll out dough between sheets of waxed paper to 12-inch round. Peel off top sheet of paper. Invert dough into 9-inch-diameter glass pie dish; peel off paper. Press dough gently into dish. Trim overhang to 3/4 inch; turn under and crimp edge decoratively. Freeze crust until firm, about 30 minutes. Position rack in center of oven and preheat to 375 degrees F/190 degrees C. Line crust with foil; fill with dried beans or pie weights. Bake crust until golden at edge, about 15 minutes. Remove foil and beans; continue to bake until crust is pale golden, piercing with fork if crust bubbles, about 12 minutes. Cool completely on rack. Reduce oven temperature to 325 degrees F/160 degrees C. Make Filling and Topping: Whisk 1 3/4 cups sugar and 1/3 cup cornstarch in heavy medium saucepan to blend. Gradually add 1 1/2 cups water and lemon juice, whisking until cornstarch dissolves and mixture is smooth. Add yolks and peel; whisk to blend. Cook over medium-high heat until filling thickens and boils, whisking constantly, about 8 minutes. Pour into prepared crust. Using electric mixer, beat whites and cream of tartar in large bowl until soft peaks form. Gradually add remaining 1/3 cup sugar, beating until stiff and shiny. Mound meringue atop warm lemon filling, spreading to seal to crust at edges. Bake pie until meringue is golden, about 20 minutes. Cool pie 1 hour. Refrigerate up to 6 hours; serve cold. Makes 8 servings. Click here to view recipe and photo of Lemon Meringue Pie with Pecan Crust on Diana's Desserts Website 
Summer Fresh Peach CobblerMade with fresh peaches, this homey cobbler captures the essence of summer. Scoops of homemade vanilla ice cream add the finishing touch.Makes 10-12 servings Ingredients: 3 lb. peaches, peeled, pitted and each cut into 8 slices 1/4 cup plus 2 tbsp. plus 1 tsp. granulated sugar 1/4 cup plus 2 tbsp. firmly packed light brown sugar 2 1/2 tbsp. cornstarch 2 tsp. fresh lemon juice 1/4 tsp. freshly grated nutmeg 1 tbsp. unsalted butter, cut into small pieces 1 batch cobbler dough (see recipe below) 1 egg, lightly beaten Serve with: Vanilla Ice Cream Instructions Preheat oven to 425 degrees F/220 degrees C. In a large bowl, stir together the peaches, 1/4 cup plus 2 tbsp. granulated sugar, the brown sugar, cornstarch, lemon juice and nutmeg. Transfer to a 2-quart rectangular baker and scatter the butter pieces on top. On a lightly floured work surface, roll out the cobbler dough 1/4 inch thick (recipe for cobbler dough follows). Tear the dough into 3-inch pieces and place on top of the peach filling. Brush the dough with the beaten egg and sprinkle with the 1 tsp. granulated sugar. Bake the cobbler for 10 minutes. Reduce the oven temperature to 350 degrees F/180 degrees C and bake until the topping is browned, 50 to 60 minutes more. Transfer the pan to a wire rack and let cool for about 20 minutes. Serve the cobbler with vanilla ice cream. Makes 10-12 servings. Cobbler Dough Ingredients: 1 1/4 cups unbleached all-purpose flour 1/3 cup granulated sugar 1/4 tsp. salt 7 tbsp. cold unsalted butter, cut into 1/4-inch cubes 1 egg yolk 1 tsp. vanilla extract 2 tbsp. very cold water Instructions In a food processor, combine the flour, sugar and salt and pulse just to combine. Add the butter and pulse until the mixture resembles coarse cornmeal, with the butter pieces no larger than small peas. In a small bowl, mix together the egg yolk, vanilla and cold water. Add the egg mixture to the flour mixture and pulse just until the dough pulls together; do not overmix. Transfer the dough to a work surface, pat into a ball and flatten into a disk. Wrap in plastic wrap and refrigerate for at least 30 minutes. Roll out the dough as directed in peach cobbler recipe. Click here to view recipe and photo of Summer Fresh Peach Cobbler on Diana's Desserts Website 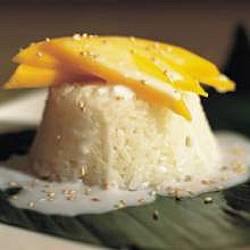
Sweet Rice with MangoesComments:In Southeast Asia, long, pliable banana leaves are used for wrapping foods before cooking to help keep the foods moist. The leaves are also used to create decorations for serving platters. Banana leaves are usually sold frozen. To use them for decoration, defrost them at room temperature, wipe them with a damp cloth, and use scissors to cut them into shapes, such as stars, triangles, diamonds or crescent moons. Place the shapes, shiny side up, on plates and rub lightly with canola oil. Makes 6 servings Ingredients: 1 cup glutinous rice For Sauce One: 1/2 cup coconut milk 1/4 cup granulated sugar 2 pinches of salt For Sauce Two: 1 cup coconut cream 1/2 cup chopped palm sugar or brown sugar 24-inch piece banana leaf, wiped clean and cut into 6 decorative shapes (optional) 2 mangoes, peeled and sliced 1 tsp. sesame seeds, toasted Instructions A day ahead, in a bowl, combine the rice and 6 cups water and let soak at room temperature overnight. Drain the rice once at the midway point and re-cover with 6 cups fresh water. The next day, pour water to a depth of 3 inches into a steamer pan. Line the steamer tray with a 20-inch square of cheesecloth. Drain the rice and spread in the lined tray. Place the tray in the steamer pan and set the steamer over high heat. Bring the water to a boil, drape the overhanging cheesecloth loosely over the rice, cover and steam for 20 minutes. Remove the tray of rice from the steamer and lift out the rice-filled cheesecloth packet. Reline the steamer tray with clean cheesecloth and invert the half-cooked rice back into the steamer tray. Drape the rice with the new cheesecloth, cover and steam over high heat until the rice kernels are tender, about 20 minutes more. Meanwhile, to make sauce one, in a saucepan over low heat, combine the coconut milk, granulated sugar and salt and bring to a low simmer, stirring to dissolve the sugar. To make sauce two, in a separate saucepan over low heat, combine the coconut cream and palm sugar and heat, stirring to dissolve the sugar. Let both sauces cool to room temperature. Line 6 small ramekins with 8-inch squares of plastic wrap. Transfer the rice to a bowl. Using a spatula, gradually mix in sauce one. Divide the rice among the ramekins, pressing down to distribute it evenly, and cover with the plastic wrap. Let stand at room temperature for 30 minutes to 2 hours; do not refrigerate. Place a banana leaf shape on a plate. Fold back the plastic wrap on a ramekin and invert onto the leaf. Lift off the ramekin and peel off the plastic. Repeat with the remaining ramekins. Garnish each with 3 or 4 mango slices, drizzle with 2 tbsp. of sauce two and sprinkle with the sesame seeds. Pass the remaining sauce at the table. Makes 6 servings. Adapted from Williams-Sonoma Collection Series, Asian, by Farina Wong Kingsley Click here to view recipe and photo of Sweet Rice with Mangoes on Diana's Desserts Website Lemon Watermelon SlushComments:A delicious and refreshing drink for a very hot summer day. Serve this ice cold drink at barbeques, picnics, or when it's just a sizzling hot day. Remember to serve the slushes in chilled glasses and don't forget to garnish each with fresh mint or miniature chocolate chips, or BOTH! Makes 8 servings Ingredients: 1 cup lemon juice, freshly squeezed, with pulp (from approximately 4 large lemons) 1/2 cup superfine or granulated sugar 8 cups seeded and diced watermelon 30 to 40 ice cubes Garnish: 2 tablespoons fresh mint or miniature chocolate chips, for garnish Instructions Note: The slushes must be made in 4 batches. In a small saucepan, bring lemon juice and sugar to a boil. Stir until all sugar is dissolved and remove from heat. Chill syrup well. For each batch, place 2 cups of watermelon into blender, add 1/4 of the chilled lemon syrup, and blend until mixed well. Add ice cubes to blender one at a time (approximately 10 ice cubes per batch), until mixture is thickened. Repeat for 3 remaining batches. Serve in chilled glasses and garnish with fresh mint or miniature chocolate chips. Makes 8 servings. Click here to view recipe and photo of Lemon Watermelon Slush on Diana's Desserts Website 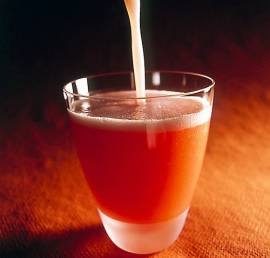
Bellini - The Italian White Peach and Sparkling Wine CocktailComments:When making this cocktail, you should avoid using French Champagne, it's richness of flavor is not a good match for such a fruity cocktail, save this for a Champagne Cocktail, or a French 75 which provide a better use for it. A light, fruity, Italian style sparkling wine is the perfect accompaniment to the peach puree. I usually use a relatively inexpensive Asti Spumanti. A true Bellini is a refreshing drink made with Sparkling Wine and Peach Puree. Many might compare this to a Mimosa, which is made with Orange Juice, but there really isn't much of a comparison. The Bellini was first invented in 1948 at Harry's Bar in Venice Italy. Giuseppe Cipriani was the head bartender at the time, and had a strong fondness for the Italian White Peaches. He worked long and hard trying to develop a perfect cocktail which would use them as a base, then he tried the simple combination of pureed white peaches and prosecco (Italian Sparkling Wine), and he knew he had something. While many recipes exist for the Bellini, some of which might include Peach Schnapps or other additives attempting to provide the essence of peach to this drink, the only true way to make it is with white peach puree. Using fresh, ripe, and peeled white peaches, puree them to a very smooth consistancy. Admittedly, White Peaches might be hard to come by in your area, fresh or otherwise. Fortunately I have found an excellent commercial product that fits the bill perfectly. The Perfect Puree Company of Napa Valley offers many different types of restaurant puree's, one of them is "California White Peach Puree" and this product works excellently for making the Bellini, in fact since it produces far less of a "foam up" then fresh peach puree does, I feel it is even better than using fresh home-made puree. This is a great summer cocktail! Tip: For the kids or for your guests that don't drink, make the Bellini's with a lemon-lime soda such as Sprite or 7-Up, instead of the sparkling wine. The Italian BelliniMakes 6 servingsIngredients 2/3 cup white peach puree 1 teaspoon raspberry puree 1 bottle chilled Prosecco, Asti Spumante Brut or other Italian sparkling dry white-wine or dry champagne Instructions In the bottom of each flute or white-wine glass, pour about 1 1/2 tablespoons peach puree and add 2 or 3 drops of raspberry puree. Pour an equal amount of the wine into each glass and serve immediately. Makes 6 servings. Tip: If white peaches are not available, use yellow peach puree and omit the raspberry puree. Click here to view recipe and photo of The Italian Bellini on Diana's Desserts Website 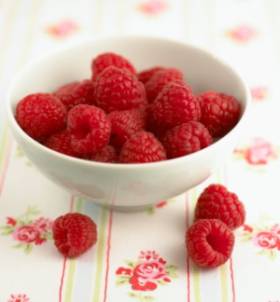
Food Tips and Information SectionRaspberriesFragile and expensive raspberries have a matchless perfume-like fragrance and incomparable flavor. Despite their apparent delicacy, they are nutritional powerhouses and packed with fiber (thanks in part to their tiny edible seeds). Some of the fiber is soluble fiber in the form of pectin that lowers cholesterol. Their phytochemical content includes such cancer-fighters as beta-carotene, ellagic acid, catechins, and monoterpenes (which also inhibit cholesterol production). Raspberries are a good source of Vitamin C, too.Varieties Most cultivated raspberries are red, but there are also varieties in yellow, apricot, amber, and purple (or "black")--all similar in flavor and texture. Availability In the northeastern U.S., local varieties are available at farm stands and markets from midsummer to late summer; however, most of the berries comes from California from June through October. Chilean imports may be available at other times of the year, although supplies are limited and prices are very high. Shopping A bramble fruit like blackberries, raspberries have a delicate structure with a hollow core, so that they have to be handled very gently and eaten as soon as possible. (Once they reach market, they have a shelf life of a day or two.) Choose berries very carefully; they are often packaged in opaque boxes that may conceal inferior fruit beneath a display of perfect specimens on top. If the box is cellophane wrapped, examine the berries you can see, and observe the box for dampness or stains indicating the fruit below may be decaying. If the box is not wrapped, you can remove a few of the top berries and peek beneath. Raspberries should be plump, dry, firm, well shaped and uniformly colored. Pass up berries that are withered or crushed. Storage Raspberries (in fact berries in general) are the most perishable of fruits; they can turn soft, mushy, and moldy within 24 hours. When you bring home a box of raspberries, turn it out and check the fruit. Remove soft, overripe berries for immediate consumption and discard any smashed or moldy berries. Gently blot the remainder dry with a paper towel. Return the raspberries to the box or, better yet, spread them on a shallow plate or pan and cover with paper towels, then with plastic wrap. Raspberries should be used within a day or two of purchase. Raspberries freeze beautifully, allowing you to enjoy them practically year-round. You can buy packaged frozen berries, but these may have had sweetener added. Freezing berries is simple. Rinse and drain raspberries using the sink sprayer so a forceful flow of water does not crush them. Spread them in a single layer on a cookie sheet and freeze until they are solidly frozen. Transfer the frozen berries to a heavy plastic bag. They will keep for 10 months to a year. Preparation Sort berries again before serving, discarding any bad ones. Rinse the fruit, drain, and gently pat dry. Frozen berries need not be thawed before using them in recipes, but extra cooking time may be necessary. Nutritional Chart Raspberries/1 cup fresh Calories: 60 Total Fat (g): 0.7 Saturated fat (g): 0 Monounsaturated fat (g): 0.1 Polyunsaturated fat (g): 0.4 Dietary fiber (g): 8.4 Protein (g): 1 Carbohydrate (g): 14 Cholesterol (mg): 0 Sodium (mg): 0 Vitamin C (mg): 31 Manganese (mg): 1.2 Source: WholeHealthMD.COM 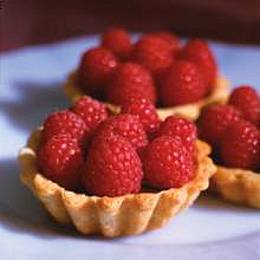
Raspberry and Chocolate TartletsComments:You can melt chocolate in a double boiler or in a microwave. If using a double boiler, be sure the water in the bottom pan does not touch the base of the top pan and that it never boils. Any moisture, including steam, that comes in contact with the chocolate could cause it to seize into a lumpy mass. (To save seized chocolate, whisk in vegetable oil or solid vegetable shortening, 1 tsp. at a time, until smooth.) If microwaving the chocolate, check it every 30 seconds to avoid scorching. When the chocolate is shiny and soft, remove it and stir until smooth. Makes 12 (2-inch miniature) tartlets Ingredients: 1 rolled-out basic tart dough round (see recipe below) 8 oz. semisweet chocolate, chopped into small slivers 6 tbsp. (3/4 stick/3 oz./85g) unsalted butter 2 tbsp. light corn syrup 1/4 cup raspberry jam 4 cups fresh raspberries Basic Tart Dough: 1 egg yolk 2 tbsp. very cold water 1 tsp. vanilla extract 1 1/4 cups unbleached all-purpose flour 1/3 cup granulated sugar 1/4 tsp. salt 1/2 cup (1 stick/4 oz./113g) cold unsalted butter, cut into 1/4-inch cubes Instructions Basic Tart Dough: In a small bowl, stir together the egg yolk, water and vanilla; set aside. To Make the Dough by Hand: In a large bowl, stir together the flour, sugar and salt. Using a pastry cutter or 2 knives, cut the butter into the flour mixture until the texture resembles coarse cornmeal, with butter pieces no larger than small peas. Add the egg mixture and mix with a fork just until the dough pulls together. To Make the Dough in a Stand Mixer: In a stand mixer fitted with the paddle attachment, stir together the flour, sugar and salt in the mixer bowl. Add the butter and beat on medium-low speed until the texture resembles coarse cornmeal, with butter pieces no larger than small peas. Add the egg mixture and beat just until the dough pulls together. Transfer the dough to a work surface, pat into a ball and flatten into a disk. Use the dough immediately, or wrap in plastic wrap and refrigerate until well chilled, about 30 minutes. To Roll out the Dough: On a lightly floured board, flatten the disk with 6 to 8 gentle taps of the rolling pin. Lift the dough and give it a quarter turn. Lightly dust the top of the dough or the rolling pin with flour as needed, then roll out until the dough is about 1/8 inch thick. Use a small, sharp knife to cut out a round or rounds 2 inches greater in diameter than your tart or larger tartlet pans. Use a small, sharp knife or a cookie cutter to cut out rounds 1/2 to 1 inch greater in diameter than your miniature tartlet pans. If using a rectangular tart pan, cut out a rectangle 2 inches larger on all sides than the pan. Makes enough dough for one 9 1/2-inch tart, six 4-inch tartlets, twelve 2-inch miniature tartlets or one 13 3/4 x 4 1/4-inch rectangular tart. Nut Dough Variation: Add 2 tbsp. ground toasted pecans, walnuts, almonds or hazelnuts to the flour mixture and proceed as directed. Note: Make A Head Tip: The tart dough may be made ahead and frozen for up to 1 month. To freeze, place the dough round on a 12-inch cardboard circle and wrap it well with plastic wrap. Alternatively, use the round to line a tart pan and wrap well. Using a 2 1/2- to 3-inch round cookie cutter or a cardboard circle and a small, sharp knife, cut out as many rounds as possible from the tart dough. Press the dough scraps together and reroll to cut out additional rounds. You should have a total of 12. Transfer the rounds to twelve 2-inch tartlet pans. Ease into the pans and pat firmly into the bottoms and up the sides. Trim off any excess dough. Press the dough into the sides to extend it slightly above the rims. Refrigerate or freeze the tartlet shells until firm, about 30 minutes. Position a rack in the lower third of an oven and preheat to 375 degrees F/190 degrees C. Place the tartlet shells on a baking sheet for easy removal from the oven. Line the shells with aluminum foil or parchment paper and fill with pie weights or raw short-grain rice. Bake until the shells are pale gold, about 15 minutes. Remove the weights and foil and continue to bake until the shells are golden, about 5 minutes more. Transfer to wire racks and let cool completely. To Make Filling and to Assemble Tarts: In the top pan of a double boiler, combine the chocolate, butter and corn syrup. Set the pan over but not touching barely simmering water in the bottom pan and melt, stirring occasionally. Alternatively, in a microwavable bowl, combine the chocolate, butter and corn syrup and melt in the microwave for 30-second intervals. Remove from the stovetop or microwave oven and stir until smooth. Pass the raspberry jam through a medium-mesh sieve to remove the seeds. Spread 1 tsp. of the jam in the bottom of each shell and fill as full as possible with the chocolate mixture. Let the filled tartlets stand at room temperature until set, 1 to 2 hours. Before serving the tartlets, place 1 raspberry, stem end down, on top of the chocolate in the middle of each tartlet and surround with additional raspberries. (You will need 7 or 8 raspberries for each tartlet.) Remove the tartlets from the pans and serve. Makes 12 (2-inch miniature) tartlets. Click here to view recipe and photo of Raspberry and Chocolate Tartlets on Diana's Desserts Website Until Next TimeThat's it for this edition of Diana's Desserts Newsletter. Hope you enjoyed the recipes and the information on Raspberries.I am planning to be back in late August or early September with my next newsletter. Enjoy the summer and if you feel up to it (with the heat and all), bake something you enjoy making and sharing with your family or friends or both. Actually, just making a nice simple dish like a fresh fruit salad with fresh fruits of the season or dessert, like strawberries with balsamic vinegar topped with whipped cream or creme fraiche, would be nice and you don't even have to bake it. For those of you who celebrate the 4th of July, enjoy yourselves and have a Happy Independence Day, and stay safe. Submit a Recipe Sincerely, Diana Diana's Desserts Diana's Desserts
A Website Dedicated to Home Bakers http://www.dianasdesserts.com E-mail Address: diana@dianasdesserts.com |