March 25, 2007 Welcome Home Bakers and Friends,I do hope all of you have had a "gentle" winter. We are quite lucky living here in California where the winters are pretty mild compared to most of the country. We do get our fair share of rain, and of course there is lots of snow in the Sierra Nevada mountains for those who like to drive up there and ski, but most of us enjoy the winter with daytime temperatures that don't often dip below the 50 degree Fahrenheit mark. Living in California has it's definite advantages. Now that's it late March (and Spring is officially here), I am looking forward to more sunshine and warmer weather and to start getting my garden back in shape after a long winter. The frost this past winter was a bit more then usual, so some of my plants need a little extra "tender loving care" after those frosty mornings. I do hope my roses do alright. I would hate to see any of them perish as they have been such beautiful friends all these years. Also, I am looking forward to planting more tomatoes in late April or early May. Last year we had such fun growing our first batch of sweet juicy tomatoes and hopefully this year they will be just as good. I do plan to try some new varieties plus the exceptional ones we planted last year that were definite "winners"; so sweet and delicious. There is nothing like home-grown fruits and vegetables for flavor and variety. If you're interested in starting a small crop of tomatoes to grow on your deck or patio (like we did), go to www.windowbox.com for a great choice for patio or windowbox tomato plants and just for tomato plants in general. They have quite a large and varied selection of interesting heirloom tomatoes. Well, I must say one good thing about winter -- it's a great time for staying inside and baking up great "comfort foods". During all those rainy winter days I had the chance to make some terrific sweet goodies for my husband and myself and it was also a great time to make some of our favorite winter dishes, such as chicken soup, pot roast (I usually do mine in the slow-cooker), beef and lamb stews, and a pasta dish made with egg noodles in a light olive oil or butter sauce topped with cottage cheese and sour cream and a little salt and pepper. That was one of my Mother's special winter time dishes that she made when it was cold outside and she felt we needed something warm and healthy. It sounds like a bit of a strange pasta concoction, but we all loved it and of course, I still do. I haven't been able to get my husband (who, you know is from England) to try it yet, but who knows, he may try it one of these days. Since he's British, and this pasta dish is most likely of Eastern European origin, maybe even Jewish, I guess it's not something he would have grown up with in England. Oh well, it's his loss. Just kidding, he usually will try most of my cooking, whether it be sweet or savory and usually he likes what I cook, but to be honest he does most of the savory cooking in our household and that makes me one lucky person! Now on to the recipes for Passover and Easter, and also some interesting information about the tropical Passion Fruit in the Food Tips and Information Section below. Hope you like the choices I have selected to share with you for these special holidays. Of course, there are many more recipes for these holidays on my website for you to look at. Enjoy! Guest Submitted RecipeHot Cross Buns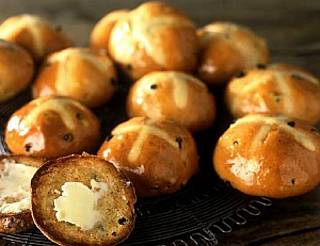 Servings: Makes 12 buns
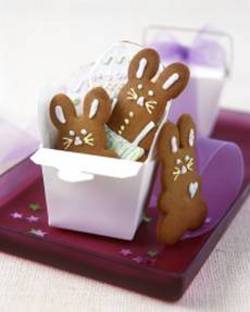
Comments: A traditional treat during the Easter season, made and eaten especially on Good Friday, the Friday before Easter Sunday. The dough for these wonderful buns can be made in your bread machine OR you may use a stand mixer. Ingredients: Add to your bread machine or stand mixer: 8 fluid oz. milk 1 beaten egg 1/2 tsp. salt 2 oz./28g butter 1 lb. bread flour 2 tsp. ground allspice 1 tsp. ground cinnamon 2 oz. granulated sugar 3 tsp. instant or bread machine yeast Additions: 3 oz. raisins or currants 1 oz. chopped mixed peel Instructions: Using Bread Machine: Knead the dough in the bread machine using the Dough cycle for 1/2 hour. Add currants and chopped mixed peel at the beep. After 1/2 hour take the dough from the bread machine and put it in a bowl, cover with a plastic film, let it proof in a warm place for 50- 60 minutes, or until it is double its size. Using Stand Mixer: Dough may be mixed and kneaded in a bowl of a stand mixer using the flat beater for mixing the dough ingredients, and using the dough hook attachment for kneading. Add the currants and chopped mixed peel after bread has been kneaded, place dough in a large bowl, cover with plastic film and let proof in a warm place for 50 to 60 minutes or until it has doubled in size. Note: The best place to proof the dough is in the oven without switching it on. Put two cups of hot water in an oven safe bowl in the bottom of oven to provide some heat and water vapour. After the dough has doubled in size, turn it out onto a floured surface and knead lightly, knocking out any large air bubbles. Divide dough into 12 pieces and shape each piece into a ball and place a little bit apart on a greased baking sheet. Cover loosely with an oiled plastic film and leave it to proof (in the oven with 2 cups of hot water) for 45 minutes or until doubled in size. The crosses are piped only after proofing. For the Decoration and Glazing: Decoration Ingredients: 3 oz. plain flour (all-purpose flour) 2 tbsp. vegetable or corn oil 1 small egg Glaze Ingredients: 4 tbsp. powdered milk 3 oz. granulated or caster sugar 4 tbsp. water To Make The Paste For The Crosses: Preheat oven to 400 degrees F/200 degrees C. Place the flour in a small bowl and add the oil and enough water to make a smooth, stiff paste. Beat the egg and brush it onto the dough pieces. Scoop the flour paste into a piping bag with a thin nozzle. Make sure there are no lumps or else this will clog the piping bag. Pipe a cross onto each bun with the flour paste. Bake the buns in preheated oven for 15 to 20 minutes or until golden brown. Then transfer to a wire rack to cool. To Make the Glaze: Heat the powdered milk and sugar with 4 tbsp. of water in a small heavy saucepan. Bring to the boil for 1 to 2 minutes. Brush over the buns to glaze. Makes 12 hot cross buns. Submitted By: Irene Date: March 9, 2004 Click here to view recipe and photo of Hot Cross Buns on Diana's Desserts Website Passover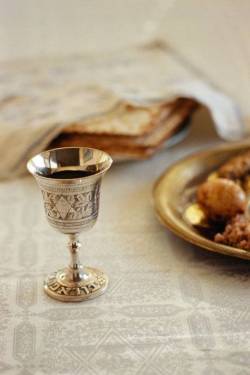 Passover is the 8 day observance commemorating the freedom and exodus of the Israelites (Jewish slaves) from Egypt during the reign of the Pharaoh Ramses II.
A time of family gatherings and lavish meals called Seders, the story of Passover is retold through the reading of the Haggadah. With its special foods, songs, and customs, the Seder is the focal point of the Passover celebration. Passover begins on the 15th day of the Jewish month of Nissan. As the Jewish day begins at sundown the night before, for the year 2007, the first night of Passover will be Monday April 2nd. The final night of Passover 2007 will be April 10th. 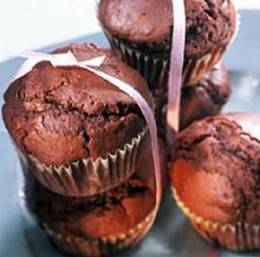
Rich Dark Chocolate Brownie CupcakesServings: Makes 14 cupcakesComments: What a treat for Passover. These luscious brownie cupcakes made with bittersweet chocolate and no flour, just matzoh cake meal. Oh so yummy for the kids and adults alike. Ingredients: 9 ounces bittersweet chocolate 1 cup plus 2 tablespoons (2 sticks plus 2 tbsp./9 oz./255g) butter or margarine, cut into small pieces 5 eggs, lightly beaten 1 1/3 cups superfine or caster sugar 3 tablespoons matzoh cake meal Instructions: Roughly chop the chocolate into pieces. Transfer to a medium-sized bowl and add the butter. Place the bowl over a saucepan of simmering water, until the two ingredients have melted. Mix well and transfer to a large bowl; set aside. Preheat the oven to 325 degrees F/160 degrees C. Sift the sugar and matzoh cake meal together, then stir into the chocolate. Add the eggs and mix well. Cover and let rest at room temperature for 30 minutes. The batter will thicken as it stands. Line a muffin pan with paper cupcake or muffin liners. Spoon 1/4 cup batter into each paper-lined cup. Bake in preheated oven for 30 to 35 minutes. The brownies will still be moist when done; they will puff up and fall slightly as they cool. Remove from oven and cool in pan on wire rack for 5 minutes, then remove from pan and let cool completely. Makes 14 brownie cupcakes. Click here to view recipe and photo of Rich Dark Chocolate Brownie Cupcakes on Diana's Desserts Website 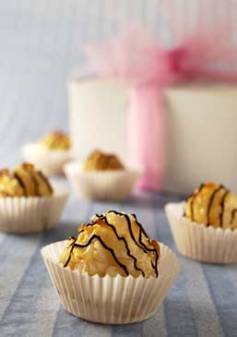
Coconut Macaroons for PassoverServings: Makes 35 macaroonsComments: These scrumptious macaroons make a wonderful treat for Passover, either as a snack or as a light dessert after your seder. If desired, drizzle chocolate ganache over the tops of the cookies for a very special "extra" for your guests that are chocolate lover's. Ingredients: 3 egg whites 1 cup granulated sugar 2-1/2 cups desiccated coconut* (see notes below) 1 cup macadamia nuts or almonds, finely chopped Chocolate Ganache (optional), for drizzling over tops of cookies.Instructions:Preheat oven to 350 degrees F/180 degrees C. Lightly grease 2 baking sheets. In a medium bowl, with electric mixer on high, beat egg whites into soft peaks. Gradually add sugar, beating after each addition until peaks are glossy. Fold in coconut and nuts. With wet hands, roll tablespoonfuls of mixture into rounds and set on baking sheets. Bake 20 to 25 minutes, or until lightly golden. Cool on racks and store in an airtight container. Macaroons will keep 2 to 3 days. Makes approximately 35 macaroons. *Notes: Desiccated coconut, available in health-food stores and the natural-foods section of supermarkets, produces an excellent macaroon. If you can't find Desiccated coconut easily, substitute with coconut flakes, found at most supermarkets. If desired, make a chocolate ganache and drizzle over tops of cookies for an extra special treat. Source: DianasDesserts.com Click here to view recipe and photo of Coconut Macaroons for Passover on Diana's Desserts Website 
Passover Chocolate Torte with Raspberry SauceServings: 10Comments: Perfect for the Jewish holiday, this flourless torte has a wonderful deep chocolate taste. The sauce adds a special-occasion touch. Ingredients: Torte: 8 ounces bittersweet or semisweet chocolate, chopped 1 cup (2 sticks/8 oz/226 gm) unsalted margarine, (Kosher for Passover)* 8 large egg yolks 1 cup granulated sugar 5 large egg whites Raspberry Sauce: 2 (12-ounce) packages frozen unsweetened raspberries, thawed with juices 1 cup granulated sugar Decoration and Garnish: (optional) 1/3 cup granulated sugar or confectioners' sugar (Kosher for Passover)* Paper doily Fresh raspberries Non-dairy whipped topping Instructions: Preheat oven to 350 degrees F/180 degrees C. Line the bottom of a round 9-inch springform pan with 2 3/4-inch-high sides with parchment paper. Stir together the chocolate and margarine in a heavy medium saucepan over low heat until melted and smooth. Remove from heat. Cool until lukewarm. Using an electric mixer, beat yolks and 3/4 cup sugar in large bowl until pale and very thick, about 4 minutes. Add chocolate mixture in 2 additions and beat until well blended. Using clean dry beaters, beat egg whites in another large bowl until foamy. Gradually add the remaining 1/4 cup sugar and beat until whites are stiff but not dry. Fold 1/3 of whites into chocolate mixture. Fold in remaining whites in 2 additions. Transfer batter to prepared pan. Bake torte until crust forms on top and cake tester inserted into center comes out with some moist batter and some moist crumbs still attached, about 55 minutes (top may crack). Run small sharp knife around torte to loosen. Cool in pan on rack (torte will fall and crack). Remove pan sides. Invert torte onto platter. If desired, decorate top of torte (see Decoration below) and garnish with fresh raspberries. Serve with Raspberry Sauce and if desired, non-dairy whipped topping. Makes 10 servings. Tip: Torte can be prepared 1 day ahead. Cover with cake dome and store at room temperature. To Make Raspberry Sauce: Puree raspberries with juices and sugar in processor until smooth. Transfer mixture to strainer set over bowl; press on solids to extract as much liquid as possible; discard solids in strainer. Tip: Sauce can be made 2 days ahead. Cover and refrigerate. Makes about 3 cups sauce. Decoration: (optional) If desired, grind 1/3 cup sugar in blender until fine powder forms or use confectioners' sugar that is Kosher for Passover. Place doily atop torte. Sift sugar over doily; gently remove doily. *Where To Purchase Passover Food Items Online Kosher for Passover Confectioners' sugar and Margarine may be purchased online at www.kosher.com. Source: DianasDesserts.com Click here to view recipe and photo of Passover Chocolate Torte with Raspberry Sauce on Diana's Desserts Website 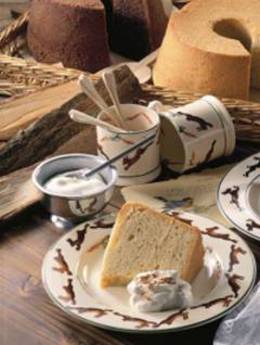
Vanilla Bean Chiffon CakeServings: 8Comments: Fresh fruit, such as kiwi, orange, pineapple, berries, or grapes are nice choices to garnish this lovely Passover cake, or serve it with whipped cream (with a dairy meal), or non-dairy whipped topping. Ingredients: 1 1/2 cups granulated or superfine sugar 1/2 cup matzo cake meal 1/2 cup potato starch 1 1/2 vanilla beans, chopped 1/2 teaspoon coarse salt 7 large eggs, separated 2 tablespoons vegetable oil 2 tablespoons brandy Garnish: (optional) Confectioners' sugar (Kosher for Passover) Optional: Serve with fresh fruit such as kiwi, orange slices, pineapple chunks, berries or grapes and non-dairy whipped topping or whipped cream. Instructions: Preheat oven to 350 degrees F/180 degrees C. Blend 1/2 cup sugar, matzo cake meal, potato starch, vanilla beans and salt in processor until beans are finely chopped. Sift mixture into small bowl; discard beans in sieve. Using electric mixer, beat egg whites in large bowl until medium-firm peaks form. Gradually add 3/4 cup sugar, beating until stiff but not dry. Using the same beaters, beat yolks and 1/4 cup sugar in another bowl until thick, about 5 minutes. Gradually beat in oil, then brandy. Beat in matzo mixture. Fold in whites in 3 additions. Transfer batter to ungreased 10-inch (25 cm) tube pan with removable bottom. Bake until tester inserted near center comes out clean, about 37 minutes. Immediately invert center tube pan onto narrow-neck bottle. Cool completely. Cut around pan sides to loosen cake. Dust top of cake with confectioners' sugar and cut into wedges. Serve with fresh fruit and non-dairy whipped topping or whipped cream (for dairy meal), if desired. Tip: Can be made 1 day ahead. Cover cake in pan. Makes 8 servings. Click here to view recipe and photo of Vanilla Bean Chiffon Cake on Diana's Desserts Website 
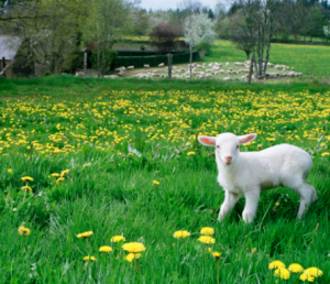
Easter and Spring Time RecipesEaster is celebrated on Sunday April 8, 2007Easter is the time of springtime festivals, a time to welcome back the Tulips, the Crocuses and the Daffodils. Its a time of new suits, new dresses and patent leather shoes. A time for Christians to celebrate the life and resurrection of Christ. And a time of chocolate bunnies, marshmallow chicks, and colored eggs! Easter Eggs-Dyeing Eggs Naturally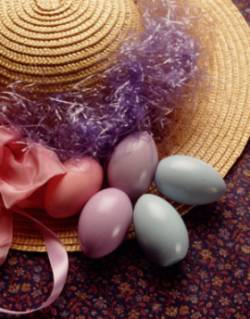 Comments:
Instead of coloring your Easter eggs the same color you've seen year after year, do something more unique dating from the medieval kitchen. Naturally dyed eggs are so elegant they can grace the table at an adult dinner party, but it's the kids who most enjoy a project like this. Parents can preboil the eggs and let children experiment with bowls of cold dyes. For safety reasons, always have an adult present to supervise. Ingredients: Natural Ingredients for Dyeing Easter EggsFor Desired Colors:For Red: Boil 4 cups of red onion skins in a quart of water for 30 minutes. Cool to room temperature. Strain and dye as usual. For Pale Red: Boil 4 cups of fresh beets, cranberries or frozen raspberries in a quart of water for 30 minutes. Cool to room temperature. Strain and dye as usual. For Pink: Soak hard boiled eggs in cranberry juice or the juice from canned or pickled beets until desired color is reached. For Blue: Boil 4 cups shredded red cabbage in a quart of water for 30 minutes. Cool to room temperature. Strain and dye as usual. Also try soaking eggs in the juice from canned blueberries. For Lavender: Soak hard boiled eggs in grape juice. For Yellow: Add 1 1/2 tsp. turmeric and 1/2 tsp. vinegar to 1 cup hot water. Cool to room temperature and dye as usual. For Light Yellow: Boil 4 cups fresh shredded carrots in a quart of water. Cool to room temperature. Strain and dye as usual. For Beige - Brown - Mocha: Soak eggs in strong brewed coffee that has been cooled to room temperature. Or add 1 Tbsp. instant coffee and 1/2 tsp. vinegar to 1 cup of hot water. Cool and dye as usual. For Pale Green - Green: Soak eggs in liquid from canned spinach or boil 4 cups fresh spinach in a quart of water. Cool to room temperature. Strain and dye as usual. For Green - Gold: Boil 4 cups of Yellow Delicious apple peels in a quart of water. Cool to room temperature. Strain and dye as usual. For Pastels: Rub fresh or frozen (thawed) berries over hard boiled egg to achieve soft blue, pink and purple shades. For Orange: Dissolve 4 Tbsp. paprika in a quart of hot water. Cool to room temperature and dye as usual. For Peach: Boil 4 cups of yellow onion skins in a quart of water for 30 minutes. Cool to room temperature. Strain and dye as usual. Instructions: *IMPORTANT NOTES:1) Natural dyes create beautiful effects, but may NOT be suitable for eating. Use for decoration only.2) It is suggested NOT dyeing eggs overnight. Some colorants may seep through the shell and make the egg unsafe to eat. 3) Always return eggs to refrigerator after dyeing. Instructions on Dyeing Techniques COLD-DIPPING METHOD:The cold-dipping method creates subtle, translucent shades, but may result in uneven coloring unless the eggs are rotated vigilantly. For the cold-dipping, the eggs and ingredients are boiled separately ( in a non-stick or glass pot). After the dye has cooled and been strained, immerse the eggs for 5 to 10 minutes and pat dry with a paper towel.THE BOILING TECHNIQUE: The boiling technique involves boiling the eggs in the dye; as the egg heats and rolls in the boiling water, a more uniform and intense color is produced. To dye 8 eggs with the boiling technique, use 2 tablespoons of vinegar per quart of water. Place eggs in non-stick or glass pot and cover with 1 inch of water. Add natural dye ingredients, bring to a rolling boil, and reduce to simmer for 20 to 30 minutes. Rinse with lukewarm water. EGG DYEING TIPS:1) Use only non-stick or glass cookware when boiling ingredients for egg dyes. This will prevent color-altering reactions with metallic pans.2) Dry freshly dyed eggs in egg carton for 10 minutes before adding to display or Easter basket. 3) Always protect table and clothes from dye. 4) To shine eggs for display, rub eggs with vegetable oil. Then wipe off. 5) Add 2 Tbsp. vinegar to egg dye to help dye adhere to eggs. EGG DESIGN IDEAS:1) Color eggs with wax crayons before dyeing. Write names or draw pictures. Dye will not adhere to wax.2) Wrap hard boiled eggs in layers of rubber bands. Soak eggs in one color. Remove a few bands and dye again in another color. Continue until all the rubber bands are removed. You'll be left with a beautiful batik design. 3) Try placing various stickers on eggs before dyeing. Dry eggs for ten minutes. Remove stickers. 4) Submerge half an egg in one color of dye. Then turn egg upside-down and dye the other half in another color for a two-toned egg design. 5) Use white glue to attach bits of ribbon, bows or sequins to colored eggs. They can easily be removed when peeling egg. Source: DianasDesserts.com Click here to view recipe and photo of Easter Eggs-Dyeing Eggs Naturally on Diana's Desserts Website
Servings: Makes 24-30 cookies |

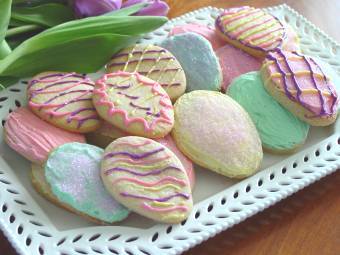 Pretty Pastel Spring or Easter Cookies