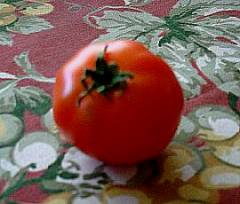
August 27, 2006 Welcome Home Bakers and Friends,My summer has been somewhat quiet, and let's say a bit uninteresting and uneventful. We haven't gotten away for a vacation, not even for a weekend. But that's ok, there's always time to get away later in the year and to be honest that might be a better idea as right now the weather is pretty warm in most places so it wouldn't be so bad to get away when the weather cools down a bit. We're just trying to endure the hot weather and trying to keep the garden in good shape. This year my roses seem to be doing quite well even with the warm weather and the terrible heat wave we had here in northern California in July. My Heirloom tomato plants, my first time planting tomatoes (see photo at top of newsletter) that we planted in May are looking very good. I bought 6 different varieties and planted them in self-watering containers on my patio in lots of sun and they all seem to be liking the warm weather and have made themselves at home in our little garden patio. Now I don't know a lot about tomato growing but all seems to be going well. We have many tomatoes on the vines which are still a bit green although a few are starting to turn red, but hopefully all of them will be turning red and beautiful soon and ready to pick. Wish us luck with our little "girls". I call them "girls" because when we got them, I would go out to the patio every day and say "Good Morning Girl's", so that's the reason. It should be interesting to see what colors our tomatoes turn out to be as they are, as I said, Heirloom tomatoes and heirloom tomatoes come in so many colors such as red, red-orange, yellow, purple-ish red, orange, etc. I'll keep you posted on their progress. We had purchased two Pluot trees of different varieties (you need two different varieties for pollination to produce fruit) a couple of years back (Pluots are a cross between a plum and an apricot with predominantly plum parentage) and finally this summer our Pluot tree has already yielded us wonderful and very sweet tasting fruit. Pluots are smooth skinned, like plums. This somewhat new fruit, which is called an interspecific (complex hybrids of two or more fruit species) is a complex hybrid of plum and apricot that is created by taking several generations of crosses and selecting for desirable traits such as high sugar content. Pluots were first introduced to the home garden in 1989 and have become very popular in supermarkets here in the United States. The fruit is unusually sweet. If you can get a very ripe one, it's hard to stop eating them because they're so good. The flavor is fantastic. I expect they will become sought after because of their eating quality. I have even seen several recipes using Pluots on the internet and also a lot of online stores are now selling Pluot Jam or Pluot and other fruit jam combinations. Pluots do not have the bitterness in the skin that plums often have. In general, pluots have an intense flavor, much like a blend of fruit juices where the mixture of taste is an improvement over any of the separate ingredients. Additionally, the sugar content of pluots is much higher than in standard plums or apricots, yielding fruit of incomparable sweetness. If you are a jam making person, then try my Pluot Jam Recipe (see below), for a delightfully sweet and delicious treat to spread over your toast, scones, bagels or english muffins in the morning. From time to time, when all conditions are just right, nature can produce truly unique treasures. Such is the case with Pluots, with a sweet and savory blend of plum and apricot flavor. We have also planted White Corn and Pumpkins in our back garden and are hoping (and keeping our fingers crossed) that we are fortunate enough to enjoy these homegrown foods from our garden later in the year. We have had success with growing large and miniature pumpkins in the past, and using the miniature ones for decorating our front porch during the autumn season. Since autumn is my favorite time of the year, I really enjoy decorating with the little pumpkins around Thanksgiving, and I know we'll truly enjoy the larger pumpkins this year for making pumpkin pie and other pumpkin desserts. I want to make Pumpkin Soup as it's always been a dish I was interested in and one that I really like. I am also looking forward to the White Corn as it's one of my favorite foods, smothered with melted butter and a little salt and pepper. Oh so yummy! Oh, and one last thing. I know many of you grow your own herbs and some of you might be interested in knowing that this year we have started an herb garden. We are growing two different kinds of mint, peppermint and orange mint (we have them in containers otherwise they'd be taking over our garden. I know, because we have grown mint in the past and it's wonderful but it does tend to spread), sage, thyme, oregano, two types of parsley, regular curly leaf and Italian flat leaf (great for cooking with), marjoram and lemon-verbena. I am anxious to try the lemon-verbena in a dessert recipe I have so I'll keep you posted. Anyway, all the herbs are doing quite well and look very healthy and happy! Well, that's about it for MY news right now. Now it's time for sharing with you some of my favorite recipes for the late summer and some goodies for the kids for their "back to school" and "afternoon" after school treats. I am also including a recipe for the Jewish holiday of Rosh Hashanah and one for Ramadan. Both of these special holidays are celebrated in late September this year. Rosh Hashanah begins at sundown on the 22nd, and the month long observance of Ramadan begins on the 24th. On to the RecipesOnce again it's that time of year, the summer is almost at its end and the kids are back in school. A good time to start thinking about what to do with those last summer fruits and vegetables and to try and come up with some new ideas for the kids for their lunch box treats and goodies to give them when they arrive home after a long day at school. Well, that's where I come in. I am here to help you with some creative ideas and hopefully some tasty ones at that. But first, here's the recipe for Pluot Jam (regular sweet plums may be substituted if you can't find Pluots).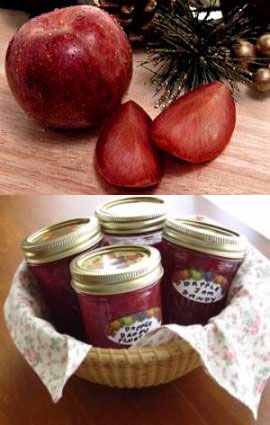
Pluot JamServings: Yield: 8 (8 oz. /236ml/1 cup//half pint) jars of jamWhat are Pluots?PluotsThe latest high-flavor stone fruit attracting "oohs and aahs" from consumers is the Pluot. If that sounds like a cross between a plum and an apricot it should. Geneticists call it an interspecific plum, a complex hybrid of plum and apricot. Pluots have predominantly plum parentage and resemble plums with generally smooth skin and have a plum shape. In general, the Pluot has an intense flavor, much like a blend of fruit juices where the mixture of taste is an improvement over any of the separate ingredients. Additionally, the sugar content of these varieties is much higher than in standard plums or apricots, yielding fruit of incomparable sweetness. Pluots, especially the very large Dapple Dandy variety, may also be called "Dinosaur Plums" or Dinosaur Eggs" when you find them in the produce section of your supermarket. You may use your own home-grown Pluots in this jam recipe, or if you can still find Pluots this season in your supermarket's produce section (usually available from June through September), you can use them. Give your kids this wonderful sweet jam to spread on their favorite type of toast for a new breakfast treat. Pluot Jam is also great spread on muffins or scones! Ingredients: 3 to 3-1/2 pounds (approximately 3 to 4 cups of prepared fruit for canning with pits removed) overripe pluots or plums, washed, dried, cut in half, pits removed (do not peel), and chopped into 1-inch pieces 1/2 cup water 4 1/2 cups sugar* (see notes below) 1 1/2 tsp. lemon juice* (see notes below) optional 1 (3-ounce) package powdered fruit pectin (such as Sure-Jell) 1 tsp. butter* (see notes below) optional Instructions: In a large pot, combine chopped pluots (or plums, if using), water, and lemon juice (lemon juice is optional). Bring mixture to a boil over high heat, stirring constantly. Reduce heat to low and cook, covered, 10 minutes or until Pluots have softened and mixture has reduced, stirring occasionally. Add the pectin to pluots in pot; stir well and heat to a full rapid boil over high heat, stirring constantly. Add the 1 tsp. butter (optional), and the 4 1/2 cups sugar. Boil exactly 1 minute, stirring constantly. Remove from heat. Set aside for 1 minute and skim off any foam that has formed. Meanwhile, sterilize 8 half-pint (8 oz.) mason jars or jelly glasses and the necessary lids and bands, according to manufacturer's directions. Divide jam among sterilized jars, leaving 1/8 to 1/4-inch space at top of each jar. Wipe rims and threads of jars to remove any jam and seal with lids and bands. Fill canning pot half full with water. Bring water to a boil. Place rack inside pot. Place jars on elevated rack in canning pot* (see note below) in boiling water; covering jars with water and allowing 1 to 2 inches of water to cover jars (you may need to add extra water for this). Cover and gently boil for 10 minutes. After processing, remove jars and set them upright on a towel to cool 12 to 24 hours. Do not retighten bands. Once jars are cool, test each one for a seal by pressing the center of the lid. The lid should not flex up and down (if it does, immediately refrigerate or reprocess with a new lid for the full length of time). Label, and store jars in a cool (50° - 70° F/10° - 20°C), dry, dark place for up to one year. Once jam has been opened, refrigerate, and use within one month. Yields: 8 (8 oz. /236ml/1 cup/half pint) jars of jam *Notes From Diana's Desserts On Amount of Sugar To Use In Recipe: If you plan to make Pluot Jam, my suggestion would be to not use as much sugar as you would for traditional plum jam. When ripe, Pluots are very sweet; much sweeter then other types of plums. Test for sweetness while cooking Pluots; adding sugar one cup at a time until you have reached the point where the mixture is sweet enough for your taste. On Using Butter: Adding the 1 teaspoon of butter to the Pluot mixture in this recipe is optional. The reason butter is often used in making jams and jellies are because it tends to cut down on the amount of foam that forms when cooking plums, Pluots or other fruit. On Using Lemon Juice: Using lemon juice inhibits the oxidation of cut fruits and vegetables as well as controls discoloration. When making Pluot or plum jam, I do not suggest using lemon juice. If you feel you must use lemon juice, use sparingly, and add more sugar to the plum or Pluot mixture. Where to Purchase Canning Pots and Steam Pressure Canners, Jelly Jars and Accessories: Canning pots, steam pressure canners, mason jars, jelly glasses, and canning accessories may be purchased online at Amazon.com, Kitchenkrafts.com, and at several other online stores or also may be purchased at some large supermarkets, at hardware stores or at cooking or garden and nursery supply stores. Source: DianasDesserts.com Click here to view recipe and photo of Pluot Jam on Diana's Desserts Website 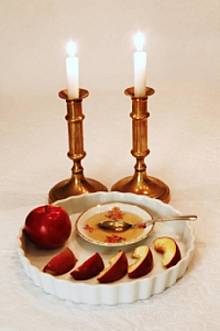
Rosh HashanahRosh Hashanah, the Jewish New Year, begins on the first day of Tishri (the seventh month of the Hebrew calendar). This year, September 22nd marks the beginning of the Hebrew calendar 5767. It's a time when families and friends gather together to celebrate and share traditional meals. Dessert, a highlight of any meal, is especially significant on Rosh Hashanah, when the symbolism of eating sweet foods ensures a sweet new year.Moist and Tender Honey-Applesauce Cake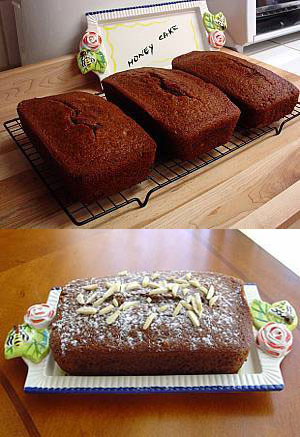 Servings: Makes 3 loaf cakes or 1 bundt or tube cake
Comments: I created this recipe for Rosh Hashanah Honey Cake after searching "high and low" for an easy yet scrumptious dessert to serve at our Rosh Hashanah dinner this year. I finally gave up on all of the honey cake recipes I looked at (and there are a zillion of them out there!!) and decided to create my own Moist and Tender Honey-Applesauce Cake recipe from scratch. Since apples and honey are such a big part of the Jewish New Year meal, what better type of dessert to make than a cake that incorporates both of these wonderful "sweet" foods. My husband Kenny says, "the cake is sweet, but not too sweet, and has just the perfect texture and is moist and just a little bit spongy", which he likes in a cake. He also says to mention that it goes so well with a nice cup of coffee. I have to agree with him, taking a bite of the cake and then a sip of coffee is heaven. I am sure you'll love this cake too. It will definitely make your New Year start off on a "sweet" note. One word of advice though, do NOT leave out the applesauce as this is what makes this cake so moist and delicious. L' Shanah Tovah, ("for a good New Year")....Diana Ingredients: Dry Ingredients: 3 1/2 cups all-purpose flour 1 cup granulated sugar 1/2 cup light or dark brown sugar 2 tsp. baking soda 2 tsp. baking powder 2 tbsp. ground cinnamon 2 tsp. ground nutmeg 1/2 tsp. ground cloves 1/2 tsp. ground allspice Liquid Ingredients: 1 cup clear honey 1 cup vegetable oil 1 cup strongly brewed tea, cooled to room temperature 3 large eggs 1/4 cup orange liqueur or orange juice 1 1/3 cups unsweetened applesauce 1 tsp. vanilla extract Optional Ingredients: 1/2 cup raisins, golden or dark 1/2 to 3/4 cup chopped almonds or walnuts (or other nuts of your choice) Topping: (optional) Confectioners' sugar Sliced or slivered almonds or chopped walnuts Instructions: Preheat oven to 350 degrees F/180 degrees C. Lightly grease or spray a 9 or 10-inch tube, angel food or bundt cake pan, or three (8 x 4-inch) loaf pans. If you are using an angel food, tube or loaf pans, line the pan (s) with parchment paper and lightly grease or spray parchment paper also. (Note: Because of the design of a bundt style pan, it cannot be lined with parchment, so this type of pan MUST be lightly greased with butter or shortening, or sprayed with a non-stick cooking spray). In a large mixing bowl, combine all of the dry ingredients. Mix well. In a small bowl, combine honey with oil. Add honey/oil mixture to dry ingredients and whisk in the remaining liquid ingredients in the order stated above. Add raisins and chopped nuts if using. Combine thoroughly. Pour batter into prepared cake pan (s) and bake in preheated 350 degree F (180 degrees C) oven for 60 to 70 minutes if using a tube, angel food or bundt pan. If using three loaf pans, bake cakes for 45 to 55 minutes. Cake (s) should spring back when lightly pressed when done and when cake tester inserted in cake comes out clean. Remove cake (s) from oven and leave in pan (s) for 10 minutes before inverting onto wire rack (removing parchment paper) to cool completely. For best flavor, make the cake (s) the day before you are going to eat them. Wrap cake (s) in aluminum foil or plastic wrap and store at room temperature for up to 3 days. When ready to serve, transfer cake to serving plate and dust top with confectioners' sugar and sprinkle with sliced or slivered almonds or chopped walnuts, if desired. Makes one (9 or 10-inch) tube or bundt cake, or three (8 x 4-inch) loaf cakes. Note: Cake may also be made in a rectangular 9 x 13-inch baking pan. If making in this size pan, bake cake for 40 to 45 minutes. Freezing: Although this cake tastes best a day or two after baking, it also tastes very nice after being frozen and thawed. This is a cake that freezes well. To freeze, wrap cooled cake (s) in aluminum foil and then wrap in plastic wrap and place in a zip-loc bag; seal, label and date. Cake will keep 4 to 6 months in the freezer. To Thaw and Serve: Thaw cake at room temperature, covered, 3 to 4 hours. Honey Tips: When making either cakes or cookies with honey, first mix the honey with the fat or the liquid in the recipe. Then mix it thoroughly with the other ingredients. If this is not done, a soggy layer will form on the top of your cookies or cakes. Desserts or other goodies made with honey brown faster than foods made with other sweeteners. So when you bake desserts made with honey, set the oven temperature 25 degrees F lower than what is indicated in the recipe. Source: DianasDesserts.com Photograph taken by Diana Baker Woodall© 2004 Click here to view recipe and photo of Moist and Tender Honey-Applesauce Cake on Diana's Desserts Website 
RamadanRamadan is the ninth month of the Muslim calendar. It is during this month that Muslims observe the Fast of Ramadan. Lasting for the entire month, Muslims fast during the daylight hours and in the evening eat small meals and visit with friends and family. It is a time of worship and contemplation. A time to strengthen family and community ties. This year Ramadan begins on September 24th.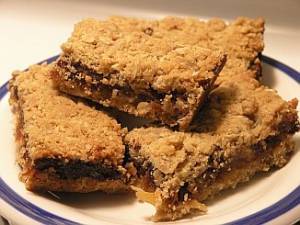
Pineapple-Date BarsServings: 6-8 Comments: One of the tricks of finding recipes that actually taste good, is to take a risk every now and then. Granted, mixing pineapple and dates doesn't really constitute much of a "risk", but I'll take my excitement where I can get it. The trick here was finding a recipe which did not detract from the taste of the dates. Adding pineapple seems to have done the trick. Added bonus? Your kitchen will smell wonderful for hours after these bars are wrapped and stored. Enjoy these delicious treats during or after Ramadan! Ingredients: 1 lb. chopped dates, pitted 1 (8 oz.) can crushed pineapple 1 tbsp. vanilla extract 1 1/2 cups all-purpose flour 1 1/2 cups rolled quick oats, (not instant) 1 cup brown sugar 1/8 tsp. salt 1 cup (2 sticks/8 oz./226g) butter or margarine, diced and chilled Instructions: Preheat oven to 375 degrees F/190 degrees C. Grease a 9 x 9-inch square baking pan. Place a medium sauce pan over medium heat. Add dates and crushed pineapple (juice and all). Cook until dates are soft. Stir in vanilla. Set aside and let cool. In a large mixing bowl, combine flour, oats, sugar and salt. Work in chilled butter until pastry is crumbly. Spread half the mixture in bottom of prepared baking pan and pat down. Cover with date filling. Spread remaining mixture on top. Bake in preheated oven for 30 minutes. Cut into squares while still warm and cool in pan before serving. Makes 6-8 servings. Recipe and photo is used by permission of Accidentalhedonist.com Source: Accidentalhedonist.com Click here to view recipe and photo of Pineapple-Date Bars on Diana's Desserts Website 
Late Summer TreatsHere are some ideas for late summer or early fall desserts to serve when you want something quick and easy to make and hopefully will please everyone's palette.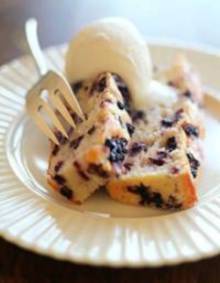
Blueberry Pound CakeServings: Makes 2 (9 x 5-inch) loaves Comments: You will find fresh blueberries in your supermarkets produce section from May through September or October. They make a great addition to late summer desserts such as pound cakes, scones, quick breads and muffins. When domestic blueberries are not available, you can often find imported blueberries in stores. If fresh blueberries are unavailable it is perfectly fine to use frozen. Make sure to fold the frozen blueberries into the batter without thawing. Enjoy this late summer Blueberry Pound Cake and serve each slice with just a dusting of confectioners' sugar, or drizzle slices with Blueberry Sauce (see recipe below) and if desired, serve with vanilla ice cream. Ingredients: 1 cup (2 sticks/8 oz./226g) butter, softened 3 cups granulated sugar 1 1/2 teaspoons vanilla extract 1/2 teaspoon lemon extract 6 eggs 3 cups all-purpose flour 1/4 teaspoon baking soda 1 cup (8 oz./226g) sour cream 3 cups fresh or frozen blueberries (do not thaw if using frozen) Confectioners' sugar (optional) Blueberry Sauce: (optional) 1 cup granulated sugar 1/4 cup cornstarch 1/2 cup cranberry juice concentrate 6 cups fresh or frozen blueberries Serve with: (optional) Vanilla ice cream Instructions: In a large mixing bowl, cream butter and sugar. Beat in extracts. Add eggs, one at a time, beating well after each addition. Combine flour and baking soda; add to creamed mixture alternately with sour cream. Fold in blueberries. Spoon into two greased and waxed paper-lined 9 x 5 x 3-inch loaf pans. Bake at 350 degrees F/180 degrees C for 60 to 65 minutes or until a toothpick inserted near the center comes out clean. Cool for 10 minutes before removing from pan to wire racks. Sprinkle with confectioners' sugar, if desired. For Sauce: In a saucepan, combine the sugar, cornstarch and cranberry juice concentrate until smooth. Add blueberries. Bring to a boil over medium heat; cook and stir for 2 minutes or until thickened. Serve warm or cold with pound cake. Makes 2 (9 x 5-inch) loaves. Click here to view recipe and photo of Blueberry Pound Cake on Diana's Desserts Website 
Zucchini BreadServings: Makes 2 loaves or 1 tube or bundt cakeComments: If you have any zucchini left that you grew in your garden this year, use some for this scrumptious zucchini bread recipe. This recipe is written especially for those of you who like the wonderful taste of spices in your breads like I do; the super taste and aromas of ginger, allspice and cloves. If you like, add the optional chopped pecans or walnuts to this marvelous bread, and you'll have one of the best "tasting" breads for you and your family to enjoy for breakfast, brunch, or as a snack or even for dessert. Serve with a spoonful of whipped cream, or for something a little bit different, try it with a dollop of lovely creme fraiche. You'll love this one......Diana Ingredients: 1 1/4 cups white whole wheat flour 1 1/4 cups all-purpose flour 1 teaspoon salt 1 teaspoon baking soda 1 teaspoon baking powder 1/2 teaspoon ground ginger 1/4 teaspoon ground allspice 1/4 teaspoon ground cloves 2 1/2 cups unpeeled grated zucchini (approximately 3 medium size zucchini) 1 cup chopped pecans or walnuts (optional) 4 large eggs 1 1/2 cups granulated sugar 1/2 cup dark brown sugar 1 cup vegetable oil 2 teaspoons vanilla extract 2 (extra) tablespoons granulated sugar For Serving (optional) Whipped Cream or Creme Fraiche Instructions: 1). Preheat oven to 350°F (180°C). Spray two 8 or 9-inch loaf pans or one 9 or 10-inch tube or bundt style pan with non-stick cooking spray, or grease with butter. If using loaf pans, line bottom of pans with parchment or waxed paper. Spray or grease parchment or waxed paper also. Set pan (s) aside. 2). In a medium size mixing bowl, combine the first 8 dry ingredients (wheat flour through ground cloves). Stir to combine well. Set aside. 3). Grate or shred zucchini using a food processor or a hand-held grater (I don't peel the zucchini, I leave the skin on). Place grated zucchini on several layers of paper towels to drain; cover with additional paper towels and set aside. 4). In a small bowl, toss together chopped nuts with about 1 to 2 tablespoons flour (This helps to prevent nuts from dropping to the bottom of loaves while baking). Note: Using nuts in this recipe is optional. 5). In a large mixing bowl, or bowl of an electric stand mixer, combine eggs, sugar, oil and vanilla. Blend ingredients by hand thoroughly, OR beat on medium speed with a hand held mixer, OR beat on medium speed with an electric stand mixer. Mix thoroughly. Add dry ingredients to mixture and blend until combined. Do NOT over mix or texture of bread will be tough. With a rubber spatula, scrape down sides of bowl; then fold in grated zucchini and nuts (if using). Mix thoroughly. 6). Pour batter into prepared loaf pans or tube or bundt style pan, if using. Sprinkle the 2 extra tablespoons sugar over the loaves or over batter in tube or bundt pan. Bake in preheated 350°F (180°C) oven for 50 to 60 minutes. Zucchini bread is done when toothpick or cake tester is inserted in center of bread and comes out clean, with no moist crumbs attached. 7). Remove from oven and let cool in pan (s) for 15 minutes; then invert onto wire rack and let cool completely. If desired, serve with a spoonful of whipped cream or for something a little different, a dollop of crème fraiche. Makes 2 (8 or 9-inch) loaves or 1 tube or bundt cake. Photograph taken by Diana Baker Woodall© 2004 Source: DianasDesserts.com Click here to view recipe and photo of Zucchini Bread on Diana's Desserts Website Grilled Panettone with Peaches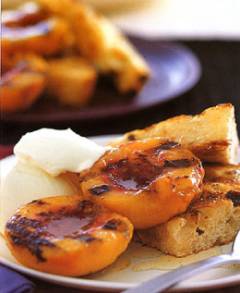 Comments:
End your cookout with a bang - dessert prepared over an open flame. Panettone, a traditional Italian dessert bread served at Christmastime, gets a summer twist in this recipe, where it's grilled for a few seconds and topped with flame-kissed peaches and vanilla sauce. Make your own panettone or purchase a loaf at your local Italian market or through an online provider. If you can't find panettone, you may substitute it with 4 large slices of fruit bread, brioche, egg or challah bread. Makes 4 servings. Ingredients: 1/2 cup superfine bakers or caster sugar 1/2 vanilla bean, halved and scraped 1 tablespoon Grand Marnier 4 ripe peaches Vegetable oil, for brushing 4 large slices panettone* (see note) 1/3 cup creme fraiche Instructions: Put the sugar, vanilla bean, and 1/4 cup water in a small saucepan and stir over low heat until the sugar has dissolved. Simmer the mixture without stirring it for 10 minutes, then remove it from the heat, stir in the Grand Marnier and keep it warm. Dip the peaches into a saucepan of boiling water for 5 seconds, then rinse them under cold water and remove the skins, which should slip off easily. Cut the peaches in half, remove the pits and lightly brush the cut sides with oil. Preheat a barbecue grill to medium heat and grill the peaches, cut side down, for 5 minutes or until golden and warmed through. Grill the panettone for 30 seconds to 1 minute on each side or until it is marked and lightly toasted. The panettone will brown very quickly, so be careful not to burn it. Arrange the grilled peaches over the panettone, drizzle with the vanilla syrup and serve with a scoop of creme fraiche. *Note: If you can't find panettone at this time of year (it is more widely available at Christmas time), you may substitute it with 4 large slices of fruit bread, brioche, egg or challah bread). Panettone can be purchased all year round online from Victoria Pastry Company in San Francisco, California. The web address for the Panettone is: http://www.victoriapastry.com/store/product.asp?pid=5560&catid=1282 Makes 4 servings. Source: BBQ Food: Get Out of the Kitchen and Turn Up the Heat by Kay Scarlett Click here to view recipe and photo of Grilled Panettone with Peaches on Diana's Desserts Website A Refreshing Drink for the Older Crowd (Not for the kid's)
Mint JulepServings: 1 or moreComments: What is a Mint Julep? One of Kentucky's claims to fame, the Mint Julep is an alcoholic drink made with fresh mint (sometimes muddled with sugar), bourbon and plenty of crushed ice. It's traditionally served in an iced silver or pewter mug at the running of the famous Kentucky Derby. However, it's a refreshing favorite on any hot day. Source: The New Food Lover's Companion, Second Edition, by Sharon Tyler Herbst Make mint juleps on a hot summer's day when you're having friends over for brunch or as a cool and refreshing cocktail before or after dinner. It's the kind of drink you'll enjoy on a hot day when just sitting on your porch or patio or laying on your chaise lounge by the pool. Ingredients: 5-6 mint sprigs 1 tsp. superfine sugar 2 tsp. water 2 1/2 oz. bourbon (Kentucky bourbon recommended, but any good bourbon will do) Crushed Ice Garnish: Fresh mint sprigs Lemon slices You will need: Mint Julep cups or highball glasses Muddler or spoon Instructions: Place mint, sugar and water in a mint julep cup or highball glass. Crush the mint with the muddler (or spoon if your bar tools aren’t as sophisticated) to release the fragrance of the mint. Stir the water, sugar, and mint until the sugar is completely dissolved. Add bourbon. Fill glass with crushed ice and stir rapidly with a spoon to frost the outside of the cup or glass. Place a short straw in the cup and garnish with mint sprig and a slice of lemon and serve immediately. Makes 1 Mint Julep. To Make Several Mint Juleps Ingredients: 2 cups superfine sugar 2 cups water Fresh mint sprigs Crushed ice Kentucky bourbon Mint Julep cups or Highball glasses Instructions: Make a simple syrup by boiling sugar and water together for five minutes. Cool and place in a covered container with six or eight sprigs of fresh mint, then refrigerate overnight. Make one julep at a time by filling a julep cup (or highball glass) with crushed ice, adding one tablespoon mint syrup and two ounces Kentucky bourbon. Stir rapidly with a spoon to frost the outside of the cup. Garnish with a mint sprig and a slice of lemon and serve immediately. Source: DianasDesserts.com Click here to view recipe and photo of Mint Julep on Diana's Desserts Website 
For the Kid's - Back to School TreatsLet's start with every "kids" favorite treat, Chocolate, Chocolate anything, right?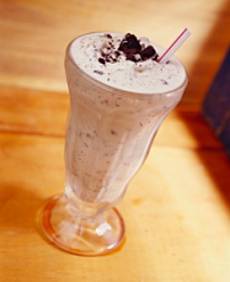
Chocolate Sandwich Cookie MilkshakeServings: 2 (12 oz.) servingsComments: Your kids won't be able to wait to get home from school to indulge in these yummy milkshakes. Try adding some chocolate syrup to the shake for an even more "chocolaty" flavor, although it won't really need it. Ingredients: 3 cups vanilla ice cream 1 1/2 cups milk 8-10 Chocolate Sandwich cookies Garnish: (optional) Chocolate Sandwich Cookies, crumbled Instructions: 1. Combine the ice cream and milk in a blender and mix on low speed until smooth. Stir the shake with a spoon to mix, if necessary. 2. Break the chocolate sandwich cookies while adding them to the blender. Mix on low speed for 5 to 10 seconds or until cookies are mostly pureed into the shake, but a few larger pieces remain. Stir with a spoon if necessary to help combine cookies. 3. Pour shake into two 12-ounce glasses and garnish top of each shake with crumbled pieces of OREO cookies. Makes 2 (12 oz.) servings. Source: DianasDesserts.com Click here to view recipe and photo of Chocolate Sandwich Cookie Milkshake on Diana's Desserts Website 
Creamy Pudding ConesServings: 10Comments: These are perfect for an after-school children's get-together, birthday party or special celebration. Use any flavor instant pudding and pie filling you like. Most kids like chocolate, vanilla or strawberry, but why not try other flavors such as Banana, Pistachio, Butterscotch or Devil's Food. They are so many new flavors now to choose from at the supermarket such as Cheesecake, White Chocolate, etc. The kids will love these very "cool" treats after a long day at school. Ingredients: 2 cups cold milk 2 packages instant pudding and pie filling, any flavor 1 (8 oz.) container non-dairy whipped topping, thawed, divided 10 ice cream cones (with flat bottoms) Garnish: (optional) Decorative candy sprinkles, for garnish Instructions: Pour milk into large bowl. Add dry pudding mixes. Beat with wire whisk 2 minutes, or until well blended. Gently stir in 2 cups of the whipped topping. Spoon evenly into ice cream cones; spread tops with remaining whipped topping. If desired, sprinkle with candy sprinkles before freezing. Freeze 3 hours or until firm. Store in freezer. Makes 10 servings (10 cones). Click here to view recipe and photo of Creamy Pudding Cones on Diana's Desserts Website 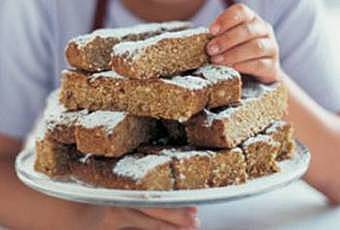
Peanut Butter-Oat BarsServings: Makes 16 barsComments: Use your favorite type of peanut butter, creamy or chunky to make these yummy bars. Most kids love peanut butter so this is a good way to add nutritious oats to their diet without them even knowing it. Good for either a breakfast treat or as a snack. Put one in your child's lunch box for a mid-day goodie that they will look forward to, or when he or she gets home from school, give them one with a big glass of milk. Sounds good and very healthy to me! Ingredients: 1 cup all-purpose flour 1 cup rolled oats 1/2 teaspoon baking soda 1/4 teaspoon salt 1/2 cup (1 stick/4 oz./113g) unsalted butter, at room temperature 1 cup firmly packed brown sugar 1/2 cup creamy or chunky peanut butter 1 egg, at room temperature 1 teaspoon vanilla extract Confectioners’ sugar for dusting Instructions: Position oven rack in the center of the oven. Preheat oven to 350°F/180°C. Grease an 8-inch square baking pan with butter, then line it with parchment paper, letting it hang over 2 sides. In a bowl, combine the flour, oats, baking soda and salt and stir with a whisk until well blended. Set aside. In a large bowl, using an electric mixer, beat together the butter, brown sugar and peanut butter on medium speed until creamy, about 3 minutes. Turn off the mixer and scrape down the sides of the bowl with a rubber spatula. Add the egg and vanilla and beat well. Turn off the mixer and add the flour-oat mixture. Beat on low speed just until blended. Using the rubber spatula, scrape the batter into the pan and spread it evenly. Place the baking pan in the oven and bake until the top of the cookie is golden and looks firm, 25 to 30 minutes. Remove the baking pan from the oven and set it on a wire cooling rack. Let cool completely. Lift the cookie from the pan, dust it with confectioners’ sugar and cut it into 1 x 4-inch bars. Makes 16 bars. Source: Recipe adapted from Williams-Sonoma Sweet Treats, by Carolyn Beth Weil (Simon & Schuster, 2006). Click here to view recipe and photo of Peanut Butter-Oat Bars on Diana's Desserts Website 
Chewy Chocolate Chip CookiesServings: Makes 36 cookiesComments: These chocolate chip cookies are chewy in texture because they rely on room-temperature butter that is beaten with the sugar until fluffy. If using candy coated milk chocolate pieces such as M&M's, they will add festive color to the cookies. These cookies are just as delicious using semi-sweet chocolate chips or white chocolate chips. Ingredients: 2 1/2 cups all-purpose flour 1 tsp. baking soda 3/4 tsp. salt 1 cup (2 sticks/8 oz./226g) unsalted butter, at room temperature 1 cup firmly packed light brown sugar 1/2 cup granulated sugar 2 eggs 2 tsp. vanilla extract 12 oz. semi-sweet chocolate chips or white chocolate chips or candy coated milk chocolate pieces (such as M&M's or Hershey's Kissables) Instructions: Preheat an oven to 350°F/180°C. Spray a cookie sheet with nonstick cooking spray. Over a sheet of waxed paper, sift together the flour, baking soda and salt. Set aside. In the bowl of an electric mixer fitted with the flat beater, beat the butter on medium-low speed until smooth, about 30 seconds. Add the brown and granulated sugars, increase the speed to medium and beat until slightly fluffy, about 1 minute, stopping the mixer occasionally to scrape down the sides of the bowl. Add the eggs one at a time, beating well after each addition, then beat in the vanilla, stopping the mixer occasionally to scrape down the sides of the bowl. Reduce the speed to low, gradually add the flour mixture and beat until just combined. Using a rubber spatula, fold in the chocolate chips. Drop the dough by rounded tablespoonfuls onto the prepared pan, spacing the cookies about 2 inches apart. Bake until golden brown, 12 to 15 minutes. Transfer the pan to a wire rack and let the cookies cool on the pan for 5 minutes, then transfer them to the rack and let cool completely. Repeat with the remaining dough. Makes 36 cookies. Source: Williams-Sonoma Kitchen Click here to view recipe and photo of Chewy Chocolate Chip Cookies on Diana's Desserts Website Food Tips and Information SectionStrawberry Papaya (also known as Watermelon or Red Papaya) Available year round.
Strawberry papaya is one of the fastest growing tropical berrylike fruits today. The major fruit crop of Hawaii's Big Island is papaya and it is the second major fruit crop in Hawaii, the first being pineapple, of course. Seeds have been spread by animals, birds and humans to all the Hawaiian Islands and papaya grows wild in many gulches. Able to grow thirty feet tall, the University of Hawaii recently developed varieties that grow only five or six feet tall to make picking easier. The trees produce in their first year but the best crops are in the second to fourth year. Fields are usually replanted or abandoned after producing three years in commercial operations. Several varieties of papaya are available in markets today ranging from tiny to as large as a watermelon. They can be one-inch fruits with lots of seeds to thick-fleshed fruits measuring twenty inches long and weighing fifteen pounds. The average papaya found in markets weighs one-and-one-fourth pounds and is six to twelve inches long. Description Firm and smooth-skinned, beautiful strawberry papayas are about the size of an elongated mango. The striking colors of this exceptional variety range from green to yellow and orange when ripe. Its shell becomes slightly soft as it ripens. Numerous small, shiny, round, black inedible seeds inhabit the cavity in the center of the fruit. Pink, firm and juicy, its scrumptious flesh is similar to a melon, offering a wonderfully sweet flavor and a pleasantly smooth texture. Papaya grows on a tree that is actually a big hollow unbranched herbaceous shrub. Clusters of papaya fruit grow along the plant stem under a crown-like group of leaves. Delightfully fragrant, dainty pretty flowers appear that may be used for making lovely leis. Nutritional Information Nutritious papaya is an excellent source of beta carotene, has a moderate amount of fiber and carbohydrates, provides 260 milligrams of potassium, contains some folic acid and is low in sodium. High in vitamin A and vitamin C, papaya contains more vitamin C than the orange. A beneficial enzyme, papain, is present in papaya and is believed to aid digestion. Papaya places first among the fruits for vitamin C, vitamin A, riboflavin, folate, calcium, thiamine, iron, niacin, iron, potassium and fiber. Following papaya for nutritional value, in order, are cantaloupe, strawberry, orange, tangerine, kiwi, mango, apricot, persimmon and watermelon. Eating five daily servings of fruits and vegetables lowers the chances of cancer. A recent study found that eating nine or ten daily servings of fruits and vegetables, combined with three servings of low-fat dairy products, were effective in lowering blood pressure. Usage A delectable taste of the tropics and since strawberry papaya lacks acidity, a squeeze of lemon or lime juice enhances flavor. For a taste treat, cut papaya in half; scoop out seeds; fill center with sour cream ice cream or frozen or chilled yogurt. Sprinkle with brown sugar or granola. Peeled fruit cut into rings is an attractive edible garnish for salads and entrees. Add its fresh goodness to sauces, smoothies, ice cream, marinades and bread. Stuffed, boiled or baked papaya may be served as a side vegetable. Spicy foods welcome its cooling effect. Add to cottage cheese, cereal and cream. Serve with fish and meat entrees. Add to fruit salads. Make refreshing beverages. Containing the enzyme papain, papaya is a natural meat tenderizer added to marinades. Wrap papaya leaves around meat to tenderize. To ripen, keep fruit at room temperature three to five days. Storing To store, refrigerate ripe papaya up to one week. Freeze firm, peeled papaya in chunks or puree and freeze. Frozen papaya is ideal for salad dressings, soups, marinades, sauces and baked goods. Uncooked papaya does not congeal in commercial gelatin with an animal protein base. Agar, a seaweed base, may be used. When making papaya chutney or jam, use commercial pectin or other fruits that have an abundance of pectin. Ethnic/Cultural Information Papaya was once used in the Islands to feed pigs and chickens. Today, this special fruit is a favorite on many menus. More mainland consumers are discovering this yummy island delicacy. Papaya is not to be confused with "pawpaw", the American custard apple. Australians use the word "pawpaw" to mean papaya. Geography/History Native to South and Central America, papaya is a New World fruit. Dating back to prehistoric times, many varieties exist today. It remains a mystery as to how and when papaya was established in Hawaii. Historical journals state that it grew in Don Francisco de Paula Marin's gardens in 1831. However, it has also been noted that earlier in 1778, Captain Cook presented Hawaii's king with a handful of papaya seeds from Central America. The seeds were enjoyed at court luaus and were exchanged as presents among the island rulers. The name "papaya" is derived from the Spanish adaptation of "ababai," from pre-Columbian people in the Caribbean. Primarily grown in Hawaii on the island of Kauai, it is grown in various tropical regions worldwide. Source: Specialty Produce Recipe Using PapayaGrilled Strawberry Papaya with Papaya Seed Vinaigrette Serve as an appetizer before a meal or as a snack.
Servings: 4-8 Comments: Here's a recipe to use before you put away your grill until next summer! Strawberry papaya is known for its reddish-orange or succulent pink flesh and its distinguishing flavor and sweetness. If you can't find strawberry papaya, choose the best ripe papaya from your supermarket's produce section. Fully ripe papayas are three-quarters to totally yellow or yellow-orange; they will give slightly when pressed gently between your palms, but should not be soft and mushy at the stem end. The skin should be smooth, unbruised, and unshriveled, but light, superficial blemishes may be disregarded. Uncut papayas have no aroma; cut papayas should smell fragrant and sweet, not harsh or fermented. Place your fully ripe papayas into a plastic bag and store in the refrigerator. They will keep for up to a week, but the delicate flavor fades, so use them within a day or two, if possible. Ingredients: 2 large (1 to 1/4 pounds each) red, strawberry or watermelon papayas (the color of the skin is usually green to yellow or orange when ripe but the flesh is pink or reddish-pink) Papaya Seed Vinaigrette: 1/2 cup fresh papaya seeds 1 cup papaya nectar (papaya nectar can be found in your supermarket's juice section) 1 cup rice wine vinegar 1/4 cup Dijon Mustard 1/8 cup fresh lime juice 3 tbsp. coarsely chopped shallots 1 tsp. Creole Seasoning* 1/2 tsp. salt 3 ounces extra virgin olive oil Vegetable oil, for brushing papaya wedges with before grilling Garnish: (optional) Coarsely chopped cashew nuts *Note: Creole Seasoning can be found in your supermarket's spice section or at gourmet or specialty food stores or you can make your own (see recipe below). Creole SeasoningIngredients:1 tsp. salt 1 1/2 tsp. garlic powder 1 1/2 tsp. onion powder 1 1/2 tsp. paprika 1 1/4 tsp. dried thyme 1 tsp. red pepper 3/4 tsp. black pepper 3/4 tsp. dried oregano 1/2 tsp. ground bay leaves 1/4 tsp. chili powder Instructions: Combine all ingredients; store in an airtight container. Use with seafood, chicken, beef, or vegetables or in salad dressings. Store herb containers in dark, cool, dry place up to six months. Because heat weakens spice flavors, avoid displaying seasonings on open racks above or near cook tops or ovens. Store seldom-used seasonings in the freezer to maintain freshness. Makes 1/4 cup. Instructions: Place all ingredients for vinaigrette in an electric blender or food processor and blend until pureed well. Pour vinaigrette into an airtight container and refrigerate until ready to use. Peel the papayas, cut into halves and scoop out the seeds (reserve the seeds for the Papaya Seed Vinaigrette), then peel the papaya with a paring knife or vegetable peeler and cut the flesh into wedges. Lightly brush papaya wedges with vegetable oil. Grill wedges over medium-high heat for 5 minutes, turning once. Place grilled papaya wedges on a large serving platter and drizzle with chilled vinaigrette. If desired, top wedges with chopped cashews. Makes 4-8 servings (depending on how many people are being served). Source: DianasDesserts.com Click here to view recipe and photo of Grilled Strawberry Papaya with Papaya Seed Vinaigrette on Diana's Desserts Website  A New Look and Feel to Diana's Desserts Website! As of this upcoming Friday, September 1st, Diana's Desserts Website will have a new "look and feel" We've (my web designer and myself) have worked very hard the last several months to update the site and all of this will be coming together on Friday. I'm so excited as I've been waiting a long time myself for the changes to take place and finally the time has come to unveil the "new and improved" Diana's Desserts Website. Please let me know what you think of it and if you have any ideas for more changes or if you have any questions regarding the site. By the way, once Friday comes and the new site is unveiled, take a look at the Conversion Calculators under the new Tips and Tools page. It's really neat. You'll be able to automatically convert from Imperial to Metric (and vice versa) for so many different things, such as wet and dry ingredients, weight measurements, length measurements, oven temperatures and a really wonderful "butter" converter for grams, ounces, tablespoons, cups and sticks. No more searching the web when you want to convert Metric to Imperial or vise versa. If you haven't used Diana's Desserts Discussion Forum yet, you may want to take a look. It has also been revamped and the new forum will be "unveiled" this coming Friday. Come on in and chat! Until Next TimeThat's it for this edition of Diana's Desserts Newsletter. I will hopefully be bringing you a new edition in late October or sometime in November. Just in time to share with you some tasty dessert recipes for the upcoming holiday season.Take good care and enjoy the rest of the summer. Officially summer is over and autumn begins on Saturday September 23, 2006, so enjoy the nice weather because before you know it it will be time to start making those "cooler weather" desserts and treats for the upcoming fall and winter months. I hope you've enjoyed reading the recipes and that you'll try one or two of them soon. If you'd like to submit one of your favorite dessert, bread or beverage recipes to Diana's Desserts Website, click on the link below: Submit a Recipe Sincerely, Diana Diana's Desserts Diana's Desserts
A Website Dedicated to Home Bakers http://www.dianasdesserts.com E-mail Address: diana@dianasdesserts.com |