DIANA'S DESSERTS NEWSLETTEREDITION NUMBER 22 September 5, 2004 Welcome Home Baker's and Friends, Well, here it is the beginning of September and it's already been two months since I sent out my last newsletter. Time passes quickly, doesn't it? Summer is nearing it's end, and Autumn is just around the corner. Can't wait for the leaves on the trees to start turning the pretty colors of fall, and also to begin baking those wonderful desserts that are so comforting during the cooler months, such as hot apple pie topped with a slice of cheddar cheese, or warm muffins to enjoy on a chilly autumn morning. Sounds good, doesn't it, especially after a very warm summer. Don't get me wrong, I love summertime, but there is just something about the cooler months that I really enjoy, like sitting by a warm fire and enjoying a nice big cup of hot cocoa. My husband Kenny and I had a very relaxing and peaceful summer. We didn't do too much, mostly stayed around the house and caught up on some overdo housework and rearranging of our kitchen, our pantry in particular, and cleaning out our 2 refrigerators and freezers. (No, they aren't both in our kitchen, the extra refrigerator and freezer are in the garage). At least things are more organized now, and we have a bit more space. My pantry was looking like a "mini" grocery store and now it's more like what a home pantry should look like, well that is, a home baker's pantry still with a lot of baking supplies, but as I said, a bit more organized. At least now we can walk in to the pantry and not be worried that we're going to slip on something on the floor that we couldn't find a place for on the shelves (before the reorganization). I hope all of you had a wonderful summer and that you got to enjoy the nice weather and maybe some of you got away for a vacation or a long weekend holiday. As this is Labor Day weekend, I hope you are enjoying the last long holiday weekend of the summer. I have missed hearing from some of you and hope that you'll start submitting your lovely dessert recipes again to Diana's Desserts website very soon. I am especially looking forward to your holiday recipes. Halloween, Thanksgiving, Christmas, Kwanza, New Years and other festive holidays are also just around the corner. Where does the time go? In this edition of Diana's Desserts Newsletter, included are recipes for "back to school" snacks for the kids and for the Jewish High Holy Day's of Rosh Hashanah (Jewish New Year) and Yom Kippur and for Sukkot. September's Guest Submitted Recipe is from Ruth Goldman of upstate New York. Ruth shares with us her recipe for Key Lime Cheesecake, a blender mixed recipe. She always keeps one on hand in her freezer for when unexpected guests arrive, so this is a cheesecake that freezes well. This month's Food Tips and Information Section is about Pears. Enjoy them eaten "out of hand" or use them in salads, for baking, poaching or sauteing wonderful desserts. Some of the best fresh pears are available during the autumn months, but if needed, canned pears are always available. I hope you enjoy the recipes and the information on Pears. 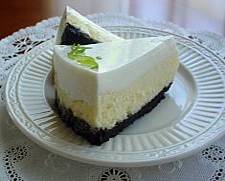
Guest Submitted RecipeKey Lime CheesecakeMakes 12-14 servingsComments: This is one of my easiest (and most sinfully delicious!) cheesecakes in my repertoire. It freezes well and MUST be cut by the baker herself in order that each guest gets only one sliver. Bon appetit, cheesecake lovers of Diana's Desserts! Ingredients: 1 cup chocolate cookie crumbs (Nabisco has them boxed) 3 tbsp. butter, melted 3 large eggs 1/2 cup key lime juice 1 1/4 cups sugar, divided 1 tbsp. vanilla extract 3 (8 oz.) packages cream cheese, softened 16 oz. sour cream Instructions: Preheat oven to 300 degrees F (150 C). Mix cookie crumbs with melted butter and press into bottom of 9-inch springform pan. Chill. Using a blender, beat together eggs and 1 cup of sugar; add key lime juice, vanilla and cream cheese, mixing well. Pour into prepared pan and bake 50 minutes or until top is set. Allow to cool. In a small bowl, mix together sour cream and 1/4 cup remaining sugar. Spoon over top of cooled cake. Return to the 300 degree F (150 C) oven and bake for 10 minutes. Chill cheesecake overnight before removing from pan. If you wish, decorate with grated fresh lime. Makes 12-14 servings. Source: Ruth Goldman Submitted By: Ruth Goldman Date: August 1, 2004 Click here to view recipe and photo of Key Lime Cheesecake on Diana's Desserts Website The Jewish High Holy Days and the Holiday of SukkotRosh Hashanah begins at Sundown on September 15, 2004 through Sundown September 16, 2004 (if Orthodox - through Sundown September 17, 2004) Yom Kippur begins at Sundown September 24, 2004 through Sundown September 25, 2004 Sukkot begins at Sundown September 29, 2004 (lasts for 8 days, and lasts for 7 days in Israel) Rosh Hashanah and Yom KippurThe Jewish High Holy Days are observed during the 10 day period between the first day (Rosh Hashanah) and the 10th day (Yom Kippur) of Tishri, the seventh month of the Jewish calendar. Rosh Hashanah and Yom Kippur are the most important of all Jewish Holidays and the only holidays that are purely religious, as they are not related to any historical or natural event. Rosh Hashanah, the Jewish New Year, is celebrated the first and second days of Tishri. It is a time of family gatherings, special meals and sweet tasting foods.Yom Kippur, the Day of Atonement, is the most solemn day of the Jewish year and is observed on the tenth day of Tishri. It is a day of fasting, reflection and prayers. SukkotWith the final blowing of the Shofar, The Jewish High Holy Days draw to a close and the focus of the Jewish community shifts from the solemnness of Yom Kippur to the jubilant celebration of the festival of Sukkot. Sukkoth begins on the 15th day of the Hebrew month of Tishri, which is 5 days after Yom Kippur. The festival of Sukkot, also known as Chag'ha Succot, the "Feast of Booths" (or Tabernacles), is named for the huts (sukkah) that Moses and the Israelites lived in as they wandered the desert for 40 years before they reached the Promised Land.RecipesRosh Hashanah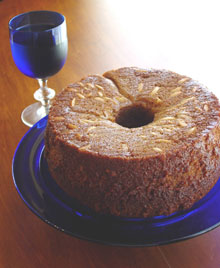
Majestic & Moist New Year's Honey CakeFrom "A Treasury of Jewish Holiday Baking" by Marcy GoldmanMakes 8-10 servings Comments: Rosh Hashanah - Jewish New Years Celebrated this year (2004) from Sundown Wednesday night September 15th through Sundown Friday night September 17th. Rosh Hashanah is observed the first and second day of the seventh month of the Jewish calender, Tishri. Coming in the Fall season of the western calendar, usually in September. The Jewish Holiday of Rosh Hashanah is widely known and celebrated as the New Years Day of the Jewish calendar, but actually Rosh Hashanah has a fourfold meaning - It is the Jewish New Year, the Day of Judgement, the Day of Remembrance, and the Day of Shofar Blowing. Rosh Hashanah is celebrated with it's holiday greeting cards, special prayers, and festive and sweet foods (to ensure sweetness in the New Year). On Rosh Hashanah it is customary for families to gather together for the holiday meal. Traditional foods sweetened with honey, apples and carrots are served, symbolizing sweetness, blessings, abundance and the hope for a sweet year ahead. The first night's meal begins with apple dipped in honey. Challah, the bread usually eaten on the Sabbath (not braided as at regular meals but instead baked in a circle - a wish that the coming year will roll around smoothly without unhappiness or sorrow) is also dipped in honey before eating. Ms. Goldman writes: "I like a New Year's honey cake to be extra moist and sweet, as good on the day of baking as it is days later: This one is queen of the realm--rich, nicely spiced, in a word, majestic in taste and stature. I went through many variations and tasting sessions until I was satisfied with this definitive cake. One taster gave the ultimate compliment, saying, "This one is worth the price of the book." Like most honey cakes, it is a good keeper and can be made a couple of days ahead"..........Marcy Goldman Here is Marcy Goldman's "sweet" honey cake (from her book, A Treasury of Jewish Holiday Baking) to serve for your Rosh Hashanah dessert. Ingredients: 3 1/2 cups all-purpose flour 1 tablespoon baking powder 1 teaspoon baking soda 1/2 teaspoon salt 4 teaspoons ground cinnamon 1/2 teaspoon ground cloves 1/2 teaspoon ground allspice 1 cup vegetable oil 1 cup honey 1 1/2 cups granulated sugar 1/2 cup brown sugar 3 eggs 1 teaspoon vanilla extract 1 cup warm coffee or strong tea 1/2 cup fresh orange juice 1/4 cup rye or whiskey (see Note) 1/2 cup slivered or sliced almonds (optional) Instructions: I like this cake best baked in a 9-inch angel food cake pan, but you can also make it in a 10-inch tube or bundt cake pan, a 9 by 13-inch sheetpan, or three 8 by 4 1/2-inch loaf pans. Preheat the oven to 350 degrees F (180 C). Lightly grease the pan (s). For tube and angel food pans, line the bottom with lightly greased parchment paper. For gift honey cakes, I use "cake collars" (available from Sweet Celebrations) designed to fit a specific loaf pan. These give the cakes an appealing, professional look. In a large bowl, whisk together the flour, baking powder, baking soda, salt, and spices. Make a well in the center and add the oil, honey, sugars, eggs, vanilla, coffee, orange juice, and rye or whiskey. Using a strong wire whisk or an electric mixer on slow speed, combine the ingredients well to make a thick batter, making sure that no ingredients are stuck to the bottom of the bowl. Spoon the batter into the prepared pan (s) and sprinkle the top of the cake (s) evenly with the almonds. Place the cake pan (s) on 2 baking sheets stacked together (this will ensure the cakes bake properly with the bottom baking faster than the cake interior and top), and bake until the cake springs back when you touch it gently in the center. For angel and tube cake pans, bake for 60 to 70 minutes; loaf cakes, 45 to 55 minutes. For sheet-style cakes, the baking time is 40 to 45 minutes. This is a liquidy batter and, depending on your oven, it may need extra time. Cake should spring back when gently pressed. Let the cake stand for 15 minutes before removing it from the pan. Then invert it onto a wire rack to cool completely. Note: If you prefer to not use the whiskey, replace it with orange juice or coffee. Makes 8-10 servings. Source: Adapted from, A Treasury of Jewish Holiday Baking by Marcy Goldman Publisher: Doubleday; (October 1998) Click here to view recipe and photo of Majestic and Moist New Year's Honey Cake on Diana's Desserts Website Yom KippurFor Yom Kippur, the Day of Atonement, traditional foods like chicken soup, Kreplach (meat-filled dumplings) and boiled chicken are served the night before a day-long fast.In order to avoid thirst during the fast, avoid spicy, salty foods. Eat moderate amounts of protein and include foods that are high in complex carbohydrates. Be sure to drink adequate liquids before and after fasting to prevent dehydration. To break the fast, low-fat dairy foods, poached fish and salads are excellent choices for your festive buffet table. Comments: Here is a lovely light cake to serve for dessert to break the fast with. 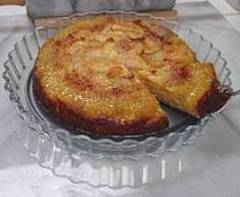 Apple Cake
Makes 6-8 servings Ingredients: 1/2 cup all-purpose flour 1/3 cup granulated sugar 1 tablespoon baking powder 1/8 teaspoon salt 1/2 teaspoon pure vanilla extract 2 large eggs, lightly beaten 2 tablespoons vegetable oil 1/3 cup whole milk 4 baking apples (about 2 pounds total), cored, peeled, and cut into thin wedges Topping: 1/3 cup granulated sugar 1 large egg, lightly beaten 3 tablespoons unsalted butter, melted Instructions: Preheat the oven to 400 degrees F (200 C). Butter a 9-inch springform pan and set it aside. In a large bowl, combine the flour, sugar, baking powder, and salt, and stir to blend. Add the vanilla extract, eggs, oil, and milk, and stir until well blended. Add the apples and stir to thoroughly coat them with the batter. Spoon the mixture into the prepared cake pan. Place the pan in the center of the oven and bake until fairly firm and golden, about 25 minutes. Prepare the Topping: In a small bowl, combine the sugar, egg, and melted butter, and stir to blend. Set it aside. Remove the cake from the oven and pour the topping mixture over it. Return the cake to the oven and bake until the top is a deep golden brown and the cake feels quite firm when pressed with a fingertip, about 10 minutes. Transfer the cake pan to a rack and allow to cool for 10 minutes. Then run a knife around the sides of the pan, and release and remove the springform side, leaving the cake on the pan base. Serve at room temperature, cut into thin wedges. Makes: 6-8 servings Click here to view recipe and photo of Apple Cake on Diana's Desserts Website Sukkot 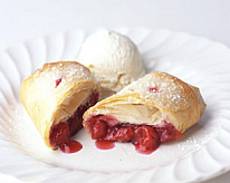
Individual Cherry StrudelsMakes 6 individual cherry strudelsComments: Individual delicious and light cherry strudels to serve to your guests for dessert on the Jewish holiday of Sukkot. If desired, place a scoop of vanilla ice cream on each dessert plate or serve with a dollop of lightly sweetened whipped cream and garnish with a mint sprig for decoration. Ingredients: 5 cups fresh or frozen (not thawed) pitted cherries (1 1/2 lb)* (see note below) 3/4 cup plus 1 1/2 teaspoons granulated sugar 2 1/2 tablespoons cornstarch 15 (17 x 12-inch) phyllo sheets, thawed if frozen 1 stick (1/2 cup/4 oz/113g) unsalted butter, melted Garnish: Confectioners' sugar Accompaniment: Vanilla ice cream or lightly sweetened whipped cream Instructions: Bring cherries (with any juices), 3/4 cup sugar, and cornstarch to a boil in a 2 1/2- to 3-quart heavy saucepan, stirring occasionally, then simmer 2 minutes. Transfer filling to a bowl and cool completely. While cherry filling cools, arrange 3 phyllo sheets in 1 layer on a work surface and let dry 15 minutes. Keeping 12 remaining sheets stacked, halve crosswise, then stack halves. Cover stack with a piece of plastic wrap and a dampened kitchen towel. Finely crumble 3 dried phyllo sheets into a bowl. Preheat oven to 400 degrees F (200 C). Arrange 1 piece of phyllo on work surface with a short side nearest you (keep remaining sheets covered) and brush with some butter. Top with 3 more phyllo pieces, brushing each with butter. Sprinkle 2 tablespoons crumbled phyllo over lower third of buttered phyllo, leaving a 2-inch border along bottom and sides, then top with a rounded 1/3 cup filling. Fold bottom edge of phyllo up over filling and fold in sides to enclose filling completely, then roll up phyllo to form a strudel, about 4 1/2 by 2 1/2 inches. Transfer, seam side down, to a buttered baking sheet. Brush top with some butter, then sprinkle lightly with 1/4 teaspoon sugar. Cut 2 (1-inch) vents diagonally across top of strudel, about 1 1/2 inches apart, with a paring knife. Repeat making 5 more strudels in same manner. Bake strudels in middle of oven until golden brown and crisp, 20 to 25 minutes. Transfer to a rack and cool 30 minutes. Makes 6 servings. Notes: Strudels can be baked 2 hours ahead and kept on rack at room temperature. Cherry filling can be made 1 day ahead and chilled, covered. Click here to view recipe and photo of Individual Cherry Strudels on Diana's Desserts Website For The KidsBack to School Snacks and Treats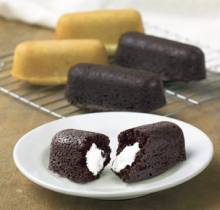
Vanilla Cream Boat Cakelets ("Twinkies")Makes 8 cakelets Comments: I have received so many requests for the recipe for "Twinkies", and I didn't have a good recipe until recently, so here it is for all of you who asked. You will need a special baking pan to make these in. The Cream Boat Pan may be purchased at Williams-Sonoma (exclusively for now). I have included the link below to click on to bring you to the page on their site where the pan is available to purchase: Cream Boat Pan - Williams-Sonoma Fun and easy to make, Cream Boats are boat-shaped cakelets that recall the popular treats we enjoyed as children. First created during the Depression, they're shaped like rotund little boats and filled with a creamy vanilla filling. You may also have known these cakelets as "Twinkies". Although the egg whites for the filling should be at room temperature, eggs are easier to separate when they are cold. Carefully crack an egg and, holding it over a bowl, pour the yolk and whites into your clean cupped hand, letting the whites run through your fingers into the bowl. Or, pass the yolk back and forth between the shell halves and let the whites slip into the bowl. Drop the yolk into a separate bowl. Separate each additional egg over an empty bowl because, if any yolk gets into the whites, the whites will not whip up properly. Note: Click here to see recipe for Chocolate Cream Boat Cakelets on Diana's Desserts Website Ingredients: Cakelets: 1 cup plus 2 tbsp. cake flour 1 1/8 tsp. baking powder 3/8 tsp. salt 1/2 cup milk 1 1/2 tsp. vanilla extract 1 whole egg plus 1 egg white 8 tbsp. (1 stick/1/2 cup/4 oz/113g) unsalted butter 3/4 cup plus 2 tbsp. granulated sugar Filling: 2 egg whites 2/3 cup granulated sugar 1/4 cup light corn syrup Pinch of salt 2 tsp. vanilla extract Special Equipment: You will need an 8-well cream boat pan. This may be purchased at Williams-Sonoma's website. Their web URL address is http://www.williams-sonoma.com Instructions: Have all the ingredients at room temperature. Preheat an oven to 325 degrees F (160 C). Generously grease and flour an 8-well cream boat pan (pan may be purchased at www.williams-sonoma.com). To make the cakelets, over a sheet of waxed paper, sift together the flour, baking powder and salt; set aside. In a small bowl, stir together the milk and vanilla; set aside. In another small bowl, lightly whisk together the egg and egg white; set aside. In the bowl of an electric mixer fitted with the flat beater, beat the butter on medium speed until smooth, about 2 minutes. Add the sugar and continue beating until light and fluffy, about 5 minutes more. Add the egg mixture in two additions, beating well after each addition. Reduce the speed to low and add the flour mixture in three additions, alternating with the milk mixture and beginning and ending with the flour. Beat each addition just until incorporated, stopping the mixer occasionally to scrape down the sides of the bowl. Divide the batter among the wells of the prepared pan. Bake until the cakelets spring back when touched and a toothpick inserted into the center comes out clean, 17 to 20 minutes. Transfer the pan to a wire rack and let the cakelets cool for 10 minutes. Invert the pan onto the rack, gently tap the pan bottom and lift off the pan. Let the cakelets cool completely. Meanwhile, make the filling: In the bowl of an electric mixer, using a handheld whisk, beat together the egg whites, sugar, corn syrup and salt just until combined. Place the bowl over but not touching simmering water in a saucepan and whisk until the sugar dissolves and the mixture is hot, 2 to 3 minutes. Set the bowl on the mixer fitted with the whisk attachment and beat on medium speed for 3 minutes. Add the vanilla and beat until the outside of the bowl is cool and medium-firm peaks form, 2 to 3 minutes more. Spoon the filling into a pastry bag fitted with a 1/4-inch plain tip. Insert the tip 1 inch into the bottom of a cakelet. Gently squeeze the filling into the cakelet while slowly withdrawing the tip. Repeat in two more places along the bottom. Turn the cakelet over so that the filling holes are on the underside and place on a serving plate. Repeat with the remaining cakelets and filling. Makes 8 cakelets. Source: Williams-Sonoma Kitchen Click here to view recipe and photo of Vanilla Cream Boat Cakelets on Diana's Desserts Website 
Healthy Banana-Oatmeal Power CookiesComments:These big, tasty (and Healthy) cookies are just what your kids will need for a good start to their busy day ahead in school. They're filled with flaked coconut, oats, raisins (or dried apricots), walnuts, bananas; all of the essential vitamins your child will need to keep him or her going until lunch time, or serve them with a big glass of milk when he or she gets home. These cookies make a delicious snack for children of all ages, even your teen-agers will love them. Makes about 18 cookies Ingredients: 1 cup all-purpose flour 1/2 cup flaked coconut 1/2 cup rolled oats 1 tsp. baking soda 1/2 tsp. salt 1/4 tsp. ground cinnamon 3/4 cup light brown sugar, firmly packed 6 tbsp. (3/4 stick/3 oz/85g) unsalted butter, at room temperature 1 very ripe banana, mashed 1 egg, at room temperature 1/2 cup chopped dried apricots or golden raisins 1/2 cup chopped walnuts Instructions: Preheat an oven to 325 degrees F (160 C). Lightly grease 1 or 2 baking sheets. In a bowl, stir together the flour, coconut, oats, baking soda, salt and cinnamon. In a large bowl, cream the brown sugar and butter with a wooden spoon until fluffy. Add the banana and egg and beat with a fork until blended. Stir in the flour mixture, about 1/2 cup at a time, then stir in the apricots and the walnuts. Spoon the dough by heaping tablespoonfuls onto the prepared baking sheet(s), spacing the cookies about 2 inches apart. Bake until golden brown, 12 to 15 minutes, switching pan positions halfway through baking if 2 pans were used. Remove from the oven and cool on the baking sheet(s) on a rack for about 5 minutes. Transfer the cookies to the rack to cool completely. Store in an airtight container at room temperature for up to 3 days. Makes about 18 cookies. Click here to view recipe and photo of Healthy Banana-Oatmeal Power Cookies on Diana's Desserts website 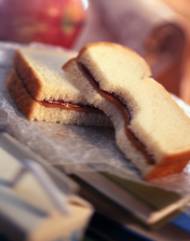
Peanut Butter and Jelly SandwichMakes 1 peanut butter and jelly sandwich Comments: Here in America, Peanut Butter and Jelly make the ultimate "kids" sandwich. In fact, I can honestly say that I haven't met a child or even an adult who doesn't like this most traditional American sandwich. A great snack for when the kids come home after a long day at school. Serve it with a big glass of milk and you're sure to have some "happy campers". Ingredients: 2 slices white sandwich bread (other types of bread may be substituted such as wheat, sliced sourdough, rye, english muffin, etc.) 2 tablespoons creamy or crunchy style peanut butter 1 tablespoon jelly, jam or preserves (Any flavor may be used. I recommend strawberry, grape, or raspberry although some people enjoy orange, apricot or peach jelly, jam or preserves instead of the red jellies, jams or preserves). Instructions: Note: Some people like their bread toasted but traditionally peanut butter and jelly sandwiches are served on non-toasted bread and on white bread. 1. Place both slices of bread on a plate that is large enough to place both slices of bread flat on the plate, side by side. 2. With a butter knife or jam or jelly spreader, spread the 2 tablespoons of peanut butter on one slice of bread. 3. With a clean butter knife or jam or jelly spreader, spread the 1 tablespoon jelly on the second slice of bread. 4. Sandwich the two slices of bread together. 5. If desired, slice the sandwich in half or in quarters. Enjoy! Makes 1 peanut butter and jelly sandwich. Source: DianasDesserts.com Click here to view recipe and photo of Peanut Butter and Jelly Sandwich on Diana's Desserts Website 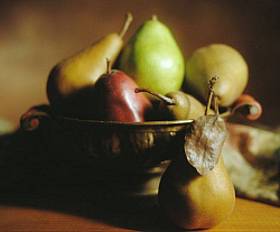
Food Tips and Information SectionPEARSFirst cultivated some 4,000 years ago, pears are now grown in temperate regions worldwide, and so enthusiastically that some 5,000 varieties have been developed. In the United States, the pear is almost as popular as the apple, to which it is related. Both are members of the rose family, and both are pome fruits (those with a distinct seeded core). When eaten with their skin, pears are a good source of dietary fiber, providing slightly more than an equivalent number of apples. Pears are not consumed in the same quantities as apples, probably because they are not quite as hardy. They quickly become mealy if left to ripen on the tree, and they have a much shorter storage life.Pear trees were brought to North America by early colonists. Though pear trees have a long lifespan (75 to 100 years), most of the original ones planted were killed by a disease called fire blight that is still prevalent enough in the northeastern part of the country to limit commercial cultivation. The blight has been severe in the Pacific Coast regions, and today 98% of the domestic pear crop is grown in California, Oregon, and Washington. Pears, like bananas, are seldom tree-ripened. Growers pick pears when they are mature but still green and firm, allowing them to ripen in the market and at home. As pears ripen, the starch converts to sugar and the fruit becomes sweeter, juicier, and softer with an almost melting texture that led Europeans to nickname some of the varieties "butter fruit." Varieties Only four principal varieties and a few specialty types of pears are available in most areas of the country. Bartletts appear in summer, the others are available in fall and winter. A number of varieties are imported when their domestic counterparts are out of season. Each type has a distinct shape and color with subtle differences in flavor and texture. Anjou: The most abundant winter pear, the Anjou, is oval shaped, somewhat stubby with smooth yellow-green skin and creamy flesh that has a slightly blander taste than the other leading varieties. Bartlett: The leading summer pear and the most popular variety, the Bartlett accounts for 65% or more of commercial production. It is also the principal pear for canning and the only variety sold dried. Large and juicy, a ripening Bartlett turns from dark green to golden yellow, often with a rosy blush. Growers have also developed a red-skinned strain. Bosc: A firm, almost crunchy pear, the Bosc has a long, tapering neck and rough, reddish brown skin. It holds its shape well when cooked so it is an excellent choice for baking and poaching. Comice: This pear is generally regarded as the sweetest and the most flavorful. The Comice is favored as a dessert pear and is likely to be included in gift boxes and fruit baskets. It has a squat shape and a dull green skin that may show light blemishes and discolorations that do not affect the flavor. SPECIALTY PEARS Seckel: Seckel is the smallest pear variety and very sweet, which makes it ideal for snacking. Winter Nellis: A spring pear with a squat shape, dull green skin, and firm flesh, Winter Nellis is excellent for baking. Clapp: Clapp is a juicy, sweet pear with green-yellow blushed skin. Forelle: Forelles are small, bell-shaped pears, with golden yellow skin and freckles that turn bright red during ripening. Asian Pears: Asian pears look like large, greenish-brown apples. They are quite crisp and have less of a pear flavor than other pears. They are in limited supply, and usually more expensive. Availability August through October is the height of the pear season, though one or another variety (supplemented by imports from Latin America, New Zealand, and Australia) is available year round. Bartlett pears are on the market from July through December; Anjou and Bosc pears from October through May; and Comice from October through December. Imported Bosc pears and a Bartlett-like variety called Packham are in season from March through July. Shopping for Pears Generally, pears should be relatively unblemished and well-colored. Some varieties will not develop full color until the fruit ripens. Bartletts turn pale yellow but may not develop their characteristic blush when they are ready to serve. Anjous stay completely green when fully ripe. Russetting, a brown network or speckling on the skin, is common on many types of pears and may indicate superior flavor. Since they are always picked unripe, pears are a "plan ahead" fruit; they will usually be quite hard in the market and need additional ripening at home to soften and attain their best flavor. Some stores offer ripe or near-ripe pears, but unless these are individually wrapped and displayed just one or two deep, they are likely to be bruised by their own weight or by customer handling. If you find ripe, undamaged pears, handle them carefully until you get them home. Ripe pears will give to gentle pressure at the stem end, depending on the particular variety: Crisp Bosc pears and firm Anjous never get as softly melting or as fragrant as Bartlett or Comice pears. Do not purchase pears that are soft at the blossom end (the bottom), shriveled at the stem end, or those that show nicks or dark, soft spots. Small surface blemishes can be ignored. Storing Pears You can ripen pears in two ways: Ripen them at room temperature first, then refrigerate them for no longer than a day or two before eating them. Or, refrigerate the pears until you are ready to ripen them--the cold will slow, but not stop, the ripening process. Remove the pears from the refrigerator several days before you plan to eat them, and let them ripen at room temperature. To speed ripening, place the pears in a paper or perforated plastic bag and turn them occasionally to ensure more even ripening. The process will take from three to seven days. Never store pears--either in or out of the refrigerator--in sealed plastic bags as the lack of oxygen will cause the fruit to brown at the core. Preparation Pears are delicious eaten with or without the peel that contains some of the fruit's fiber. For other purposes, remove the core with a melon baller or apple corer from the bottom. Halve the fruit lengthwise and scoop out the core with a teaspoon or a melon baller. Peel very thinly with a paring knife or vegetable peeler, if necessary, and coat the peeled or cut pears with lemon juice to keep them from darkening. Pears respond well to cooking, turning even more mellow and creamy. The cooking time will vary with the type and degree of ripeness of the pear; slightly underripe fruit will hold its shape better for poaching or baking than fully ripe, sweet fruit, which is best for making pear sauce or puree. Baking: Bartletts and Boscs both hold their shape well during cooking. Core the unpeeled fruit from the bottom, then cut a thin slice from the bottom so the pears will stand upright. Or halve the pears lengthwise and core them. Stuff the halved pears, if desired, and place them in a baking dish with a small amount of liquid. Cover with foil and bake in a 325°F oven until tender, basting occasionally with the pan juices. Cooking time: 40 to 60 minutes. Poaching: Pears may be poached in water, fruit juice, or wine. Red wine or cranberry juice will tint them a deep rose color. Add whole cloves, cinnamon sticks, or ground spices to the cooking liquid. To poach, rub peeled and cored whole pears with lemon juice, then place them in simmering liquid and cook, partially covered, until tender when pierced with a knife. Turn the pears once during cooking and baste them occasionally with the cooking liquid. Cooking time: 15 to 20 minutes. Sauteing: For a sweet and spicy side dish, saute unpeeled pear slices in fruit juice or stock; season with cinnamon, ginger, or curry powder. Cooking time: two to five minutes. Source: WholeHealthMD.com Recipe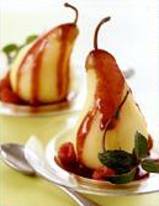
Poached Pears with Ruby Red Raspberry SauceMakes 2 servingsComments: Serve these lovely Poached Pears with Ruby Red Raspberry Sauce for a perfect ending to an intimate dinner for two. Enjoy with a glass of slightly dry white or red wine. Ingredients: 2 medium, ripe Bosc pears (with stems on) 1/2 lemon 2 teaspoons granulated sugar 1 1/2 cups fresh or frozen raspberries, thawed 1/3 cup confectioners' sugar 1 tablespoon black currant-flavor or orange-flavor liqueur Garnish: Mint sprigs 10 fresh raspberries Instructions: 1. With apple corer or a small knife, remove cores from blossom end (bottom) of pears. Peel pears almost to top but do not remove stems. Rub pears with lemon half, sprinkle with sugar. 2. In a glass pie plate, arrange pears lying down with stems toward center, add 2 tablespoons water. Cook, uncovered, in microwave oven on High 5 to 6 minutes, until tender, turning pears over halfway through cooking. Transfer pears, stem ends up, to 2 dessert plates, set aside until ready to serve. 3. In blender at high speed, puree raspberries. Sift confectioners' sugar through coarse sieve into small bowl. Press raspberry puree through same sieve into same bowl to remove seeds. Discard seeds. Stir liqueur into raspberry mixture. 4. To serve, spoon raspberry sauce over poached pears. Garnish with mint sprigs and fresh raspberries. Makes 2 servings. Click here to view recipe and photo of Poached Pears with Ruby Red Raspberry Sauce on Diana's Desserts Website Until Next MonthThat's it for this month's newsletter. I certainly hope that you enjoyed the "Back to School" recipes and the information on Pears and the brief explanation of the Jewish High Holy Days of Rosh Hashanah and Yom Kippur and also the Jewish holiday of Sukkot.Diana's Desserts Newsletter for October will focus on recipes for Halloween "Treats" (Halloween is always celebrated on October 31st), and some helpful information on the Muslim holy month of Ramadan, a 29-day period culminating with the festival, Eid ul-Fitr, or Feast of the Fast-breaking. The first day of Ramadan will be on Saturday, October 16, 2004. I will share some ideas with those of you who are Muslim, recipes to break the fast with and also what are some healthy foods to eat during the fasting period. Columbus Day in America is celebrated this year on Monday October 11th. Italian communities in America, as well as many other Americans, celebrate by eating wonderful Italian foods. Included in October's newsletter, I will have a delicious Italian dessert recipe for all of you to try. If you are interested in submitting one of your favorite dessert, bread or beverage recipes to Diana's Desserts Website, please click on the link below to bring you to the Submit a Recipe page: Submit a Recipe Have a wonderful September and enjoy your baking and cooking. For those of you who are Jewish, have a very Happy and Sweet New Year! Sincerely, Diana Diana's Desserts
A Website Dedicated to Home Bakers http://www.dianasdesserts.com E-mail Address: diana@dianasdesserts.com |